Showing posts with label embellished crochet academy. Show all posts

Texture it With Knots! The Bullion Rose---2

Best Blog Tips
Last week we made our first bullion knot rose. This week i would like to share with you a second rose also made with the bullion knot.


Materials:

If you are making these rosebuds as an all-over after-the-fact embellishment on a bag, and you used yarn for the bag, you can use yarn for the rosebuds.
If you want a contrasting fiber, you can use Perle or pearl cotton for the rosebuds.
Suggested colors: DMC Pearl Cotton Thread, Size 3, 16 yds. (15m)
Very Dk. Shell Pink
Rose
Very Lt. Shell Pink
If you want to use yarn, use the following colors:
Red Heart Shocking Pink or Country Rose
Rose Pink or Pretty 'N Pink
Baby Pink or Raspberry


Choose where you want your stitch to go on your bag or garment, bring the needle through from the back to the front at that spot, then you insert the needle a few stitches below that, and bring the needle up near where you oribilaly brought the needle through to start up,
then you wrap the yarn around the needle (if you are using yarn, wrap 10 times, if you are using embroidery thread, wrap 15 times. Not too tightly so that you can pull the needle through!) Pull your needle through, tighten it up a bit and to anchor it in place, pull your yarn or thread through to the other side.
For second side of center, bring out needle a little bit under the bullion just made, then, insert needle through beside the bullion stitch just made and make a bullion with 8 wraps. pull needle through, tighten stitch and ancor it in place. Fasten off on the wrong side. Thread needle with Pretty 'N Pink, if using yarn.
If using Pearl cotton, thread needle with Rose. Starting right underneat the darker center, bhering the needle through, then stitch above where you stitched the last bullion, to make this petal longer than the last one, make 12 wraps, pull needle through, tighten stitch, and anchor it.
Repeat this last stitch on the opposite side but make 14 wraps instead of 12. Pull through, tighten stitch. Ancor sittch and fasten off.
Thread needle with Baby Pink of with Very Lt. Shell Pink, if you are using Pearl cotton. Make a small Bullion of 8 wraps underneath the center rosebud already made. Pull through and tighten. Anchor stitch. Make another bullion on the opposite side with 8 wraps. Pull through and tighten. Anchor stitch.
Make another bullion a little bit above that one with 8 wraps. Ans another one on the opposite side a bit above the last one with 10 wraps.Make a tiny bullion across the top with 6 wraps. As always, pull needle through wraps, tighten, then anchor stitch.
Then go a little bit inside the top of the rose and make another 6-wrap little bullion. Pull needle thorugh, tighten stitch and anchor it.
Finally, make a small, 6-wrap bullion onthe side of the rose, (You can continue for as long as you want to and make the rose as large as you want to, but we will stop with a small rose.)
Once you have made your rosebuds, you can add little crocheted leaves (if you want to). Use Red Heart worsted weight yarn Tea Leaf or if you use pearl cotton, make leaves with Med. Pistachio Green.
For this one I decided to make 2 bullion leaves, one a bit to the side of the bottom and one above the last petal.




Best Blog Tips

Clarissa Frog Closure

Best Blog Tips

This is a substantial but beautiful frog closure. It is recommended for a large bag or tote.
You can also use it for a shawl or a vest. Unfortunately, a dark yarn does not do justice to the beauty of this frog, but I needed it in this color for a project for my mom, and decided to share it anyway.

Materials-
Worsted weight yarn of your choice (I used Read Heart worsted weight Black) about 3 oz.
Crochet hook size G
Scissors
Blunt needle
Sewing thread of color to match your yarn
Button of color to match your yarn
Pins
Pillow or cardboard to pin to

To make frog closure, proceed as follows:

Note- Before you make your ch 3 to start the rope, leave off a long tail, you will need it at the end of the project.

1- Make a crocheted rope 28 inches long.
If you don't know how to make a rope, please refer to our tutorial that teaches how to make them.
You will find it here:
How to Make the Crocheted Ropes
2- Once you have made the rope, fasten off, leaving a long tail to sew with.
3-Measure and cut a piece of yarn of the color of your rope, 33" long and thread blunt needle with it.
4- Fold rope in half, matching ends.
5- Cross left leg of the rope over right leg, adjust to the size of the button you have chosen for your frog (this is the buttonhole).
While holding it with one hand, turn it to the wrong wide and with the blunt needle, make some stitches on the wrong side to secure the buttonhole loop (don't worry, the back of the frog closure will be sewn onto your project anyway and won't show.) Fasten off beginning end, and secure at back of rope, you can even pull the little knot into the rope and make it disappear there. What you want is to make sure that
your closure will not fall apart with use.Leave the rest of the yarn in the blunt needle. At the back of the rope, make a stitch that will bring the remainder of the yarn to the very center, between the two legs of the rope that are hanging. Take the yarn out of the needle.
Now, pin the buttonhole loop to a pillow or to a piece of cardboard so that the piece will not be moving all over the place while you work.
6- Fold the left leg of the rope over the center and behind the hanging piece of yarn, now fold the right side under the center piece of hanging yarn and over the right cord, now the rope comes up through the loop and passes over the left rope. Pull to tighten, but not too much, we want the knot to show.

7- Fold the left leg of rope again, under the center piece of hanging yarn over the right leg of the rope, the right leg of the rope goes over the center and then down through the loop formed by the fold and passes under the left rope.
Tighten a bit but not too much so that the knot will show.
8- Thread blunt needle again with leftover hanging yarn and fasten off at back of frog. As you do that, take advantage of the yarn to secure the knots well so that they will not twist to the side.
Secure well at back and cut yarn.
9- Thread blunt needle with the long tail left at the beginning of the rope. Now, working on the wrong side of the frog, begin to turn the end of the rope into a curl and to sew it in place by using the little loops that naturally form at the end of the rope as you crochet it. Keep turning and sewing with tiny stitches, until you reach the side of the center knots.
Stitch to side of central knots using the little loops that form naturally on ropes. Secure at back.
10- Repeat the same process with the leftover leg of rope.
Now you can sew you pretty for to your project!
Done!


Heaven Hell
Best Blog Tips

Easy Fancy Frog Closure

Best Blog Tips

This frog is pretty easy to make and it looks terrific, whether you use it to close a bag or tote or in a jacket or cardi.

As with all our frogs, to be able to make this frog, you will first need to make our ropes. Please refer to our tutorial on how to make them.
You will find it here:
How to Make the Crocheted Ropes

Note- The most important thing you need to keep in mind when making the ropes for the first time is that after you make the first sc, you have to forget about the regular top loops in which you usually insert the hook to make your sc, ignore those, and look for the little loop that naturally forms on the side when you make your first sc, insert your hook THERE. Then, pull up your yarn and finish your sc as usual. Turn. Now look on the side again and you will see TWO little loops, insert your hook through those TWO loops, pull up your yarn, and finish your sc as usual. Turn and look for the TWO loops again and repeat the process as before. If you do it that way, your rope will come out perfect!

Materials-
Worsted weight yarn, color of your choice
Crochet hook size H
Pins
A pillow or cardboard surface to pin to
Scissors
Measuring tape
Sewing thread to match your frog or button
Sewing needle
Blunt needle
Button to match your frog and size appropriate for your frog's buttonhole

To make this frog, make a rope that is 19" long.
To make the frog, fold the rope in half, matching ends.
1- Pass left end over right end, forming a loop, matching ends.
2- Twist the loop once to match size of the button you will be using.
3- Pass right end over itself, forming a loop, pin in place.
4- Pass left end over itself, forming a loop, pin in place.
5- Cross left end over right end once. Pin in place.

Thread blunt needle with yarn and discreetly sew the frog together so that it will not come apart with you take off the pins. Thread blunt needle with yarn and sew in place on your bag, except for buttonhole loop. Fasten off, weave in tail.
Sew button opposite to frog buttonhole loop.

Done!

............
Bible Universe
Best Blog Tips

Dragonfly Frog

Best Blog Tips

This is a super easy but very cute from closure that you can use in bags, totes, and even in clothing! To be able to make this frog, you will first need to make our ropes. Please refer to our tutorial on how to make them.
You will find it here:
How to Make the Crocheted Ropes

Materials-
Less then half a skein of a worsted weight yarn of your choice
Crochet hook size H
Pins
Pillow or cardboard to pin to while you are forming the frog
Measuring tape
Scissors
Blunt needle to sew
Button in color of your choice to match size of loop made
Sewing thread for button in matching color

To start, make a rope 18" long.
Now, to form the frog, proceed as follows:
1- Fold rope in half, matching ends.
2- Bring right end of rope over left end, forming a loop. (Make sure to match ends all the time as you work.)
3- Straighten loop to match the size of the button you will be using.
4- Bring right end over itself and form a loop, repeat with left end. Pin down.
5- Pass left end over right end and twist. Pin down.
Thread blunt needle and sew in place, except for loop that will act as a buttonhole.
Fasten off, weave in ends securely.

....................................................................

Read FREE online, the beautiful book on the life of Christ, The Desire of Ages see the comforting love of God like never before in these tough times!

Best Blog Tips

Helen's Strap

Best Blog Tips


This is a pretty easy to make purse strap, it is quite lovely if you make it in two colors, so that the loops will show more. Sew the ends to purse rings and you're set!
Materials-
Worsted weight yarn of your choice (I used Red Heart) in at least 2 different colors (for the sides), I chose to make it in 3 different colors for effect.
Crochet hook size H.
Scissors
Pins
A surface to pin your ropes to while you loop (it could be a pillow or a piece of cardboard)

As usual, we will start with two crocheted ropes. Please refer to our tutorial on how to make them.
You will find it here:
How to Make the Crocheted Ropes
Your ropes can contrast or match your bag in any combination of your liking.
To start, make your ropes. Pin them to the top of your working surface or pillow.
Step 1- Take rope #1, the one that is to the left and bring it to the front of rope #2, then around that rope to the back of it and then pass it over the little curve that formed as you went around, and bring it back to the front again.
Step 2- Now take rope #4 (the one that lies first to your right), bring it to the front of the middle rope (rope #2), around it toward the back and then
bring it to the front again, passing it over the little curve that forms on the side as you work. Tighten a bit.

To form your strap, repeat step #1 and step #2 alternately for as long as you need to to form the length of strap you want.
Fasten off, and sew ends to purse rights.

Done!

If you want to, you can make the loops a bit more loose to allow the middle color to be seen. But if you make them tight, you will have a nice, strong strap that you
look very nice pretty rings in a small purse with pretty as a substitution to a more expensive wooden handle. It also makes a strong strap for a large tote bag.


..........
A Courageous Attitude. . .


Best Blog Tips

Snail Frog Closure

Best Blog Tips

This very easy frog closure looks wonderful in both clothing and in bags and totes! I used it recently for a scarflet and realized how pretty it would look at the end of a purse flap or to close up a tote and decided to add it here also. Once you learn how to make it, you can experiment and make variations to suit your taste and your bags!

With Bright Yellow and H hook, leaving a long tail at the start, ch 2.
Row 1- 1 sc in second ch from hook. Turn. (NO ch 1)
Row 2- Take a close look at the side of your stitches, there is a tiny loop on the side, insert hook into that loop and pull up yarn
through it, now you have two loops on hook, yo, and pull yarn through all loops on hook. Turn. (NO ch 1)
Row 3- Now you will see that 2 loops have formed on the side of your stitches, insert hook through BOTH of those loops and pull up yarn,
yo, and pull yarn through all loops on hook. Turn. (NO ch 1)
Row 4- Rep row 3.
Rows 5 to 32- Rep row 3. Fasten off, leaving long tail to sew with.

Note 1- Notice that little loops form at the edge of your rope as you crochet, you will be using those little loops to sew up your frog closure.

Forming the Snail-
Thread blunt needle with leftover tail. Turn the end of the cord into a circle, and using the loops on the edges, stitch your circle, continue to
turn the rope around itself and to sew, until you have only 3 inches of rope left. (Use a measuring tape to make sure.) Fasten off and secure yarn
at back of the circle formed. (this is the snail's shell.) You can now snip the leftover yarn or leave to use it to attach your frog closure to the scarfie, that is what I will do.
Now, Turn the leftover rope around towards the "shell" you just formed. This is the rest of the snail and also the buttonhole loop of your frog closure. Using the tail you left at the beginning
of your rope, sew the buttonhole loop to the "shell", secure at back of rope. Now, take a good look at your snail. If the "shell" is too much to the side, simply,
turn the circle a bit, towards the top of the buttonhole loop and secure in place by sewing the side loops together. Secure at back. If you consider that the buttonhole loop is too
large for the button you have selected, simply sew a couple of side loops together on the inside of the buttonhole loop and then bring the yarn to the back of the rope. Fasten off. Secure at back.


Done!


.............
The Key to the Storehouse


Join Craftybegonia on Facebook!

I want to thank Bar Purple's Dropped Stitches for giving me this award.

I am a little embarrassed when I get these awards, but do want to show my appreciation to the people who kindly give them to me!
Seven things about myself?
1- I love ragdoll cats but my cat Lilly is a gray tabby. She's bossy and loving and absolutely wonderful!
2- All of our pets have been rescued. We have two dogs that were abused and we are trying with love, to heal their trust in people. They are very loving too.
3- I love peach and pink, and every color of the rainbow, but almost never buy the one that i first thing I want when I go for yarn!
4- I do not design anything ahead of time, but make them as I go.
5- I love lace and vintage things.
6- One of my most enjoyable things in crafting is to do charity items. I think it is very rewarding and fulfilling.
7- I love God.
I'm going to do something different, and instead of offering 15 blogs, I will offer 15 people worthwhile to follow on Twitter. Here they are:
@vashtirama
@allsocute
@CrochetSpot
@Crochetnmore
@CrochetAllDay
@daisydaycrochet
@NexStitch
@KristinOmdahl
@AmigurumiPatt
@HotLavaCrochet
@HOTS_Crochet
@amigurumix
@FiberValleyGirl
@ReginasFiberArt
@CrochetLibFront
Best Blog Tips

Heart Frog

Best Blog Tips

This is a pretty frog that would enhance the look of any bag or tote you make. It is very easy to make also.

Materials-
Worsted weight yarn of your choice (I used Red Heart Hot Red)
Crochet hook size H

Make a crocheted rope 16" long. (If you do not know how to make a crocheted rope, please refer to this tutorial: How to Make Crocheted Ropes)

Once you have your rope made, proceed as follows to make your frog:
Fold rope in half, matching ends. Twist once, forming a loop the size of the button you will be using. Thread a blunt needle with the yarn you used to make the rope, sew the center loops right below the twist you made to form the buttonhole (about 5 loops).

Turn one end up to form one of the sides of the heart, and continue to sew center. Stitch also the portion you curled up to secure the heart shape. Rep on the other side. Twist the ends that are on the sides to form small circles and sew to secure. Fasten off. Weave in tail.

Note-
Always use side loops of rope to sew shapes together.
Done!

...............

Moving Mountains. . .
Best Blog Tips

Frog Closure

Best Blog Tips

This is a pretty and easy to make frog closure that is wonderful for a garment as well as for a bag.

With Spring Green and H hook, ch 2.
Row 1- 1 sc in 2nd ch from hook, ch 1, insert hook in side loops, pull up, yo, pull loop through.
Row 2- Insert hook in side loops, yo, and make a regular sc. Rep this row until you reach 16 inches long.
Fasten off. Thread a blunt needle with Spring Green.
Bend the cord in half, matching both sides so that they will have the same size. Turn one of those ends around as a spiral, as you turn, secure the spiral turns in place with small stitches using the little loops on the sides of the cord, fasten off.
Stitch the other end of the cord to the top of the spiral, fasten off. Take the loop you have now formed and make a knot in the middle of it with your fingers, forming a buttonhole. Sew in place. Sew your chosen button on opposite side.
You're done!

You can make variations of this closure by using a thicker yarn, by using both yarn and a filament-enriched cotton thread, a yarn together with a metallic thread, etc.
Let your imagination give you ideas!

..................
God can Provide


Best Blog Tips

Jasmin's Strap

Best Blog Tips


This strap is very, very easy to make and it looks cute on a large tote. It is a knotted strap. You can make it with cords of a single color to match your tote, or if you work like me, in many colors, you can tailor it to the color palette you used to make your bag.

Materials-
Worsted weight yarn of appropriate color to make your cords
Crochet hook size H
Scissors
Pins
Purse rings
Pillow or piece of fabric to pin your cords to for stability when knotting

To learn how to make the Basic Rope to make this strap, please go here:Basic Rope Tutorial

Make 4 cords in the colors you have chosen for your bag.
Pin the cords to a pillow, to allow you to work more freely.
You will working in pairs as follows:

1- Bring first rope on the left to the front of second rope to the left, move the end of the rope to the back and around the second rope, and through the loop that is formed, pull to tighten.
Repeat for the second part of the knot.
Now, working on the opposite side, bring first rope to the right in front of second rope to the right, take it to the back of the second rope and then through the loop that forms. Repeat for the second part of the knot.

2- Repeat step #1

Leave a little bit of slack so that the colors will show. And now, let's work the center.

3- Bring second rope to the right in front of second rope to the left, around the rope towards the back, and then through the loop that forms. Repeat to form the second part of the knot.

4 and 5- Repeat step #1, twice.

Alternately repeating this process for as long as you need to, will form your strap. Wasn't that easy?

..........

Broken Toys
Best Blog Tips

Naomi's Braid or Purse Strap

Best Blog Tips


This braid or strap is a colorful and easy way to add interest to a common-looking and otherwise drab little tote or bag. If you have made a large bag and it looks a bit dull, even with bright colors and seems to be missing "something", why not add one of these fun and attractive straps? You will find a few nice ones in this blog.

To learn how to make the crocheted ropes, please search for the tutorial about them by using the Search box at the right hand side of this blog post.

Make 4 crocheted I-cord ropes of different colors contrasting or harmonizing with the color or colors of your bag or tote.
The ropes will be more attractive if they are not made all the same color, it will also be easier for you to keep track of where
the ropes go, when you're a newbie at this.
Leaving at the edges to the braid a bit of free rope so that you can easily sew the finished braid to the purse rings once you are done, proceed as follows:

1- Pass rope 4 under rope 3 and then bring to the front over the same rope, and towards the back over itself, forming a loop. Tighten. Repeat again.
Repeat the same procedure with rope 1 and rope 2, twice.

2- Cross the two middle ropes over each other, left rope over right rope. Place the ends behind the two side ropes.
3- Cross the side ropes in the middle, the left rope over the right rope.
4 and 5- repeat steps 2 and 3 twice.
6- Repeat step 1.

Continue repeating these steps for the length of your strap. Sew ends to a purse ring and you're done!


.................
Bible Universe
Best Blog Tips

Cynthia's Purse Strap or Handle

Best Blog Tips

An interesting and pretty purse handle or strap can add interest to even a common-looking tote or bag. This one's pretty easy and you can use it to liven up any bag!

Color is key in a rope strap. You can make the strap in contrasting colors or in different hues of the same color of your bag.
Make 4 crocheted cords (please, use the search box in this blog to find the tutorial on how to make ropes) in 4 different colors, this way you will be able to follow the tutorial , the more easily.

Pin the ropes to a pillow or a piece of cardboard with some fabric on top to avoid soiling.
To make the braid proceed as follows:

1- Place rope #4 over the two central ropes and under rope #1.
2- Bring rope #1 under the two central ropes and out over rope #4. Carefully, tighten up a bit to
pull up the beginning of the knot.
3- Bring new rope #1 under the two central ropes and over rope #1, bring rope #1 over the two central ropes and under rope #4. Tighten up a bit. You just formed a square knot.
4- Bright rope #1 over rope #2, rope #4 over rope #3, bring the two new central ropes over one another, the left one over the right one. Bright the two ropes at the edges over the two central ones, and cross them one over the other as before. Bring the ropes that are now at the two edges to the center over the other two and cross them as before.
5- Repeat a square knot.

Alternate rows 1 to 5 until you have the length of strap you need. When you finish, sew ends to purse rings. Fasten off.

...................
Bible Universe
Best Blog Tips

Frog Closure

Best Blog Tips
Originally, I made this closure for one of my neckwarmers, but it works so well for a purse or bag that I decided to share it here.

Materials-
Worsted weight yarn scraps to match or contrast the bag or tote you are making.
Crochet hook size H
Scissors
Sewing thread
Sewing needle
Button of your choice


Frog-style closure: With Lipstick yarn and G hook, make a crab stitch braid that is 10 inches long. Fasten off leaving a long tail to sew with.
You can make your closure in several ways, but let's try a simple one. Bend the crab stitch cord you just made in half, take the left leg of that bent cord and cross it over the right side leg, forming a loop, without undoing that loop, insert that same leg of cord into the center of the loop and pull gently, until you have a nice knot that looks almost like a Josephine knot, and two pieces of crab cord at both ends. You are going to bend those two pieces of cord and sew them with the tail you left, one upwards and one downwards, to form your frog. Then you will sew this to the neck warmer at a height that is comfortable to close it around the neck, using the small loops of the crab cord to anchor your stitches. Fasten off. Sew button opposite loop of the frog closure on the other side of the neck warmer. Fasten off.
Note: Since this is a closure and it will pulled ever time the neckwarmer is used, sew your stitches firmly, not tight, but firm so that the pretty frog will not come apart.
You're done!
This pattern has been corrected. Thank you again, Margaret!
Fire-ice-aiken, the pattern is simpler now!


.............................

Determining the Will of God
Best Blog Tips

Betsy's Woven Purse Handle

Best Blog Tips


This is one of the easiest weavings to make for a pretty purse or bag handle.
Make 3 crocheted ropes in 3 different colors which either contrast or harmonize with your bag, tote or purse.
Make them a little bit longer than you think your need them, to allow for the twisting and weaving, but leave one end
attached to the ball or skein, just in case you need to add more length to complete your project.
Attach the finished end of each rope to a pillow or something that will allow you to do the weaving without the ropes moving all over the place. The rope that will weave through the twisted ones, if still attached to a ball or skein, must lie on the
opposite direction than the others, otherwise, the ball or skein will not permit you to pass the rope through the twists.
To make the woven braid, proceed as follows:

1- Attach first two braids. Then twist them over each other, pin down to keep them in place.
2- Take weaver rope and then pass it over and under in between the middle of the twists.

Once you have the desired length, sew to a purse ring and you have a pretty embellished strap for your next purse, tote, or bag!


When You Need to Have Strength. . .
Best Blog Tips

Marly's Braid or Purse Strap

Best Blog Tips


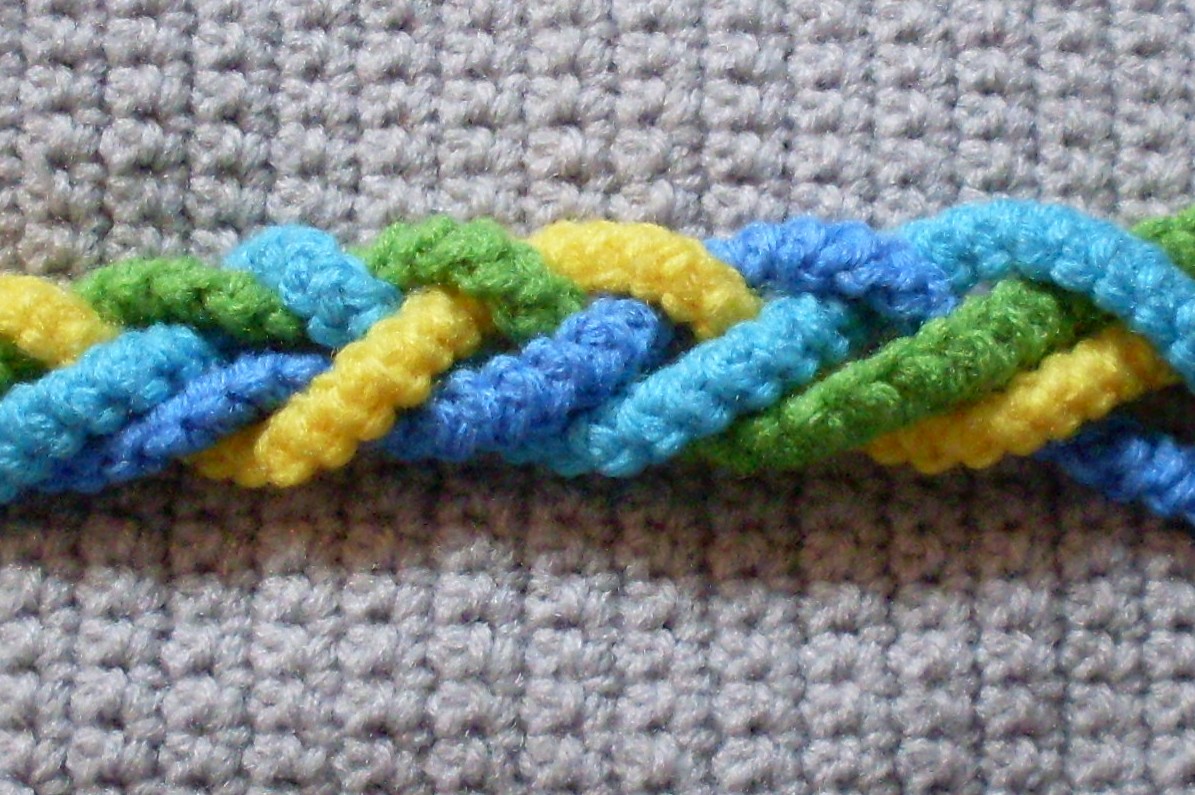
This pretty braid can be used either to embellish a purse or a tote bag or for the strap of the bag. To make this easy but pretty braid, make 4 ropes in different colors, I used Red Heart yarns because they are easily found by all, the colors I chose, if you happend to like the color combo, were:
Bright Yellow, Delft Blue, Turqua (to get a nice aqua shade)and Spring Green, for the MacIntosh apple tone (please refer to previous tutorials to learn how to make the ropes.)
To make the braid proceed as follows:Pin the ropes to a pillow or to a piece of cardboard (with a piece of fabric underneat to keep the braid clean) to make it easier for you to make the braid.

1- Cross rope 3 over rope 2.
2- Without bringing the to the top, but moving them underneath the previously made cross, bring rope 4 and rope 1 to the center and cross rope 1 over
rope 4.
3- Cross tope 4 over rope 3 (bue over aqua) and rope 1 over rope 2 (green over yellow).
4- Cross rope 3 over rope 2 (aqua over yellow).
5- Bring Blue and green ropes to the center, underneath the other 2 ropes. Cross blue over green rope.
6- Bring the other two ropes underneath the previous rope and cross the yellow over the aqua.
7- Cross the aqwua over the green and the yellow over the blue.
8- Bring the yellow and the aqua underneath the other two ropes and cross them.
9- Bring the blue and the green under the yellow and the aqua and cross them.
Continue these steps for as long as you want to, thios will make a lovely braid for the front of a bag or a very striking handle for a bag!

When Things Go Wrong...
Best Blog Tips

Debra's Braid

Best Blog Tips

This is a fun braid, it is a combination of 3-strand and 4-strand that occurred to me as I was working with ropes. I named it after a friend of our family. This braid makes a pretty embellishment for a bag that needs a little "something."
To make this braid, you will need 4 crocheted ropes (please look at previous tutorials to learn how to make them!) preferably of 4 different
colors so that you will be able more easily to track where each one goes (and the braids look prettier that way.)
To make braid proceed as follows:
1- Working only with the first 3 ropes, cross rope 3 over rope 2.
2- Bring rope 1 over rope 2.
3- Bring rope 3 over rope 2.
4- Bring rope 1 over rope 2.
5- Bring rope 4 underneath rope 3 and over rope 2, bring rope 1 over it.
6- Bring new rope 4 under rope 3, over rope 2 and under new rope 1.
7 to 10- Ignoring new rope 1, and working only with 3 ropes, rep rows 1- 4.

Rep all these rows over and over to get your rope.


When Things Go Wrong...
Best Blog Tips

Gladys' Braid

Best Blog Tips

This is a simple 3-strand braid which is left open for effect. It is a bit asymmetrical and angular, which makes it interesting and less common than the usual 3-strand braid, it is also very easy to make.


Glady's braid will be most effective in 3 colors, especially if the they contrast against the background of the bag.
Make a ball of yarn for each color of rope you will be making, then make your ropes.

To make it proceed as follows:

Make your crocheted ropes as we have made them in previous tutorials. (Please take a look at our previuos tutorials and beautiful braids.)
Make twice as much as the size of the bag or tote you want to embellish. Leave one end of the rope attached to the ball of yarn, justin case you run
out of rope before you have finished the amount of braiding you need or on the other hand, if you have a bit more rope than you need, to be able to unravel and adjust
it.

Pin one end of ropes to edge of bag or purse, leaving an excess that will be folded over the edge of the bag and which will disappear under the lining.
To braid, work in the following manner:

1- Bring rope #1 over rope #2, then pass rope #3 over rope #2.
2- Bring new rope #1 over new rope #2, and new rope #3 over rope #2. (Leave the braiding quite "open" so that the fabric of the bag will show through.)
Continue to repeat these two rows, continuously until you have the length of braid you want.
............................
Alone in the Crowd
Best Blog Tips

Half Hitch Bag Strap

Best Blog Tips


There are many ways to make attractive straps for bags and purses. Sometimes, a common-looking bag can be "spruced up" by a surprising strap that doesn't follow the expected road. You could use this hitch stitch even to decorate a bag, but it is used most often for bag straps.
It is very easy to make, and if you make it in two colors, it's very attractive and calls attention to the bag.


To make it, you will need:

Two crocheted ropes, the color of your choice, (please search for the braiding tutorials to find how to crochet the cords or ropes) approximately twice the size of the length of the strap, leave one end of the crocheted rope attached to the ball of yarn, just in case you need to make it longer after all,
and work with the opposite side that you've already finished. This will save you problems, if for some reason, you wind up with more cord or less cord than you need for your strap.

Half hitches are a macrame stitch. It is one of the basic stitches and one of the most used to make bag straps. The strap we will be making is an alternating half hitch chain, made with two ropes or cords. To make it, proceed as follows:

1- Pin the working end of your ropes to a piece of cardboard or to a pillow securely.
Then hold the inactive cord straight down, keeping it somewhat taut. Bring the opposite, or working rope across and place it in front of the inactive rope, then
bend it around the inactive cord, and then out of the bend above the working rope, moving it towards you. Then lift the working rope's end and tighten a bit.

2- Now, making the second half hitch running on the opposite side. To make that one you will put the working rope behind the inactive rope, bring it around from back to front, forming a loop and insert the end of the working rope towards the back of the working cord. Pull to tighten into place.

To make the strap you will alternate these two half hitches back and forth for as loong as you need to.


Don't forget always to alternate the strand until you get the length of strap you want. Now, sew the ends of the strap firmly around a purse ring, or if you prefer, for added strenth, join a bit of yarn to one edge of the strap and crochet 1 or 2 rows of sc, across, thus joining the cords to one another, and then, bend the end of the halft hitch strap around the purse ring and sew it across this little strip of sc stitches.


That will make it stronger for daily wear. Do the same thing with the opposite end of the strap.


You're done!


.....................

From STRESS to Joy


Best Blog Tips