Showing posts with label embellishment. Show all posts

Texture it With Knots! The Bullion Rose---2

Best Blog Tips
Last week we made our first bullion knot rose. This week i would like to share with you a second rose also made with the bullion knot.


Materials:

If you are making these rosebuds as an all-over after-the-fact embellishment on a bag, and you used yarn for the bag, you can use yarn for the rosebuds.
If you want a contrasting fiber, you can use Perle or pearl cotton for the rosebuds.
Suggested colors: DMC Pearl Cotton Thread, Size 3, 16 yds. (15m)
Very Dk. Shell Pink
Rose
Very Lt. Shell Pink
If you want to use yarn, use the following colors:
Red Heart Shocking Pink or Country Rose
Rose Pink or Pretty 'N Pink
Baby Pink or Raspberry


Choose where you want your stitch to go on your bag or garment, bring the needle through from the back to the front at that spot, then you insert the needle a few stitches below that, and bring the needle up near where you oribilaly brought the needle through to start up,
then you wrap the yarn around the needle (if you are using yarn, wrap 10 times, if you are using embroidery thread, wrap 15 times. Not too tightly so that you can pull the needle through!) Pull your needle through, tighten it up a bit and to anchor it in place, pull your yarn or thread through to the other side.
For second side of center, bring out needle a little bit under the bullion just made, then, insert needle through beside the bullion stitch just made and make a bullion with 8 wraps. pull needle through, tighten stitch and ancor it in place. Fasten off on the wrong side. Thread needle with Pretty 'N Pink, if using yarn.
If using Pearl cotton, thread needle with Rose. Starting right underneat the darker center, bhering the needle through, then stitch above where you stitched the last bullion, to make this petal longer than the last one, make 12 wraps, pull needle through, tighten stitch, and anchor it.
Repeat this last stitch on the opposite side but make 14 wraps instead of 12. Pull through, tighten stitch. Ancor sittch and fasten off.
Thread needle with Baby Pink of with Very Lt. Shell Pink, if you are using Pearl cotton. Make a small Bullion of 8 wraps underneath the center rosebud already made. Pull through and tighten. Anchor stitch. Make another bullion on the opposite side with 8 wraps. Pull through and tighten. Anchor stitch.
Make another bullion a little bit above that one with 8 wraps. Ans another one on the opposite side a bit above the last one with 10 wraps.Make a tiny bullion across the top with 6 wraps. As always, pull needle through wraps, tighten, then anchor stitch.
Then go a little bit inside the top of the rose and make another 6-wrap little bullion. Pull needle thorugh, tighten stitch and anchor it.
Finally, make a small, 6-wrap bullion onthe side of the rose, (You can continue for as long as you want to and make the rose as large as you want to, but we will stop with a small rose.)
Once you have made your rosebuds, you can add little crocheted leaves (if you want to). Use Red Heart worsted weight yarn Tea Leaf or if you use pearl cotton, make leaves with Med. Pistachio Green.
For this one I decided to make 2 bullion leaves, one a bit to the side of the bottom and one above the last petal.




Best Blog Tips

Pepper's Braid

Best Blog Tips


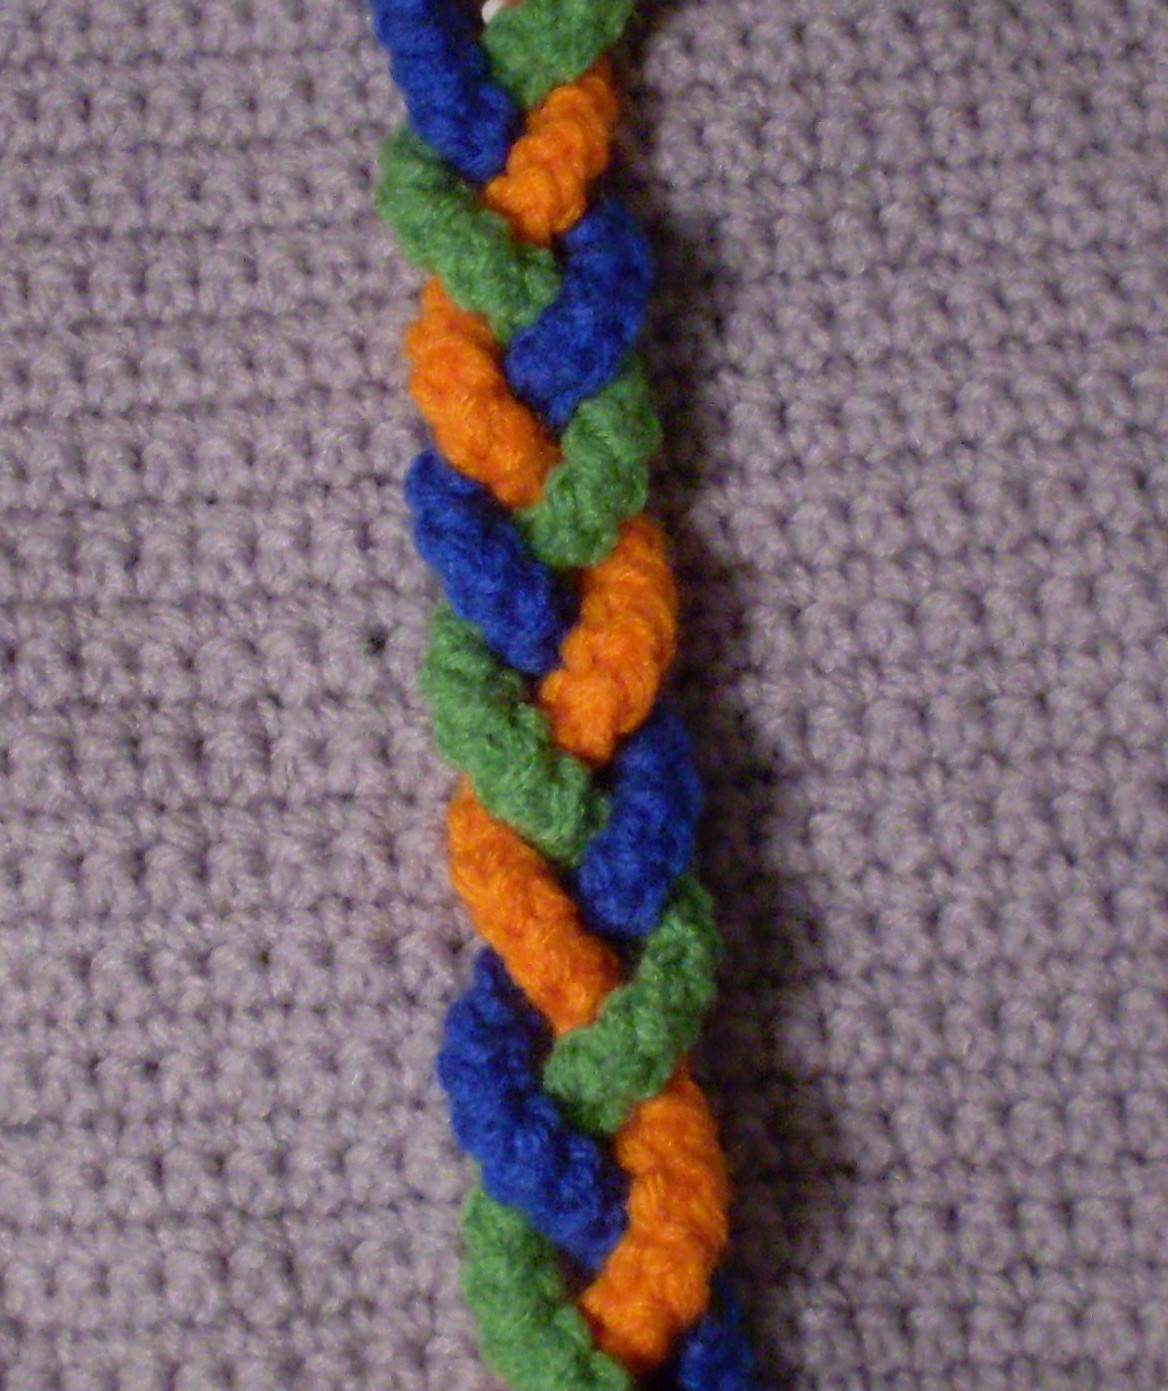
This is a pretty easy braid which will enhance any bag you want to embellish!
Note 1-
Unitl you learn how to make this braid well, i suggest that you learn to make it using 4 cords of different colors (it would look lovely against the black, dark brown, grey, white or beige crocheted fabric of a purse or bag.)
Or if you want to, use darker or lighter shades of the same color as the bag you will sew it to or contrasting variegated yarns that match or vice versa.
This will help you to keep track of where the cords are going until you learn this braid by heart, and no one will notice why you do it.
Materials:
4 Basic cords twice the size of the space they will be covering on the bag

Note 2- If you want to match the size of the cords exactly, do not fasten them off, but simply make bobbins before you start your cords with enough yarn to make more than twice the cord you believe you need, in case you need to add to your cord.
Nice little economic bobbins can be made from the little square closures of sandwich bread. Place the unfinished portion of the braid to the bottom of your work. If you can complete the braiding to your satisfaction with the amount of cord you already had, wonderful!
Simply fasten off, leaving a long tail to sew with, and sew the braid in place once you have finished it. But if you are short, simply attach pins to secure the braiding you have done above, and crochet yourself some more cord to finish your embellishment. Then, fasten off and sew in place.
Note 3- To keep your cords in place, pin them as you go so that they will not move from where you want them. If you want your braid to be as open as the one in the photos, keep the cords position "open" so that the crocheted fabric of your bag can be seen through the twists and turns of the braid.


Make Pepper's Braid as follows:


1- Place your 4 cords at the top of the bag you want to embellish, leaving 2 sc in between each cord. Pin them securely into place so that you can work freely.


2- Bring cord #1 over cord #2.


3- Bring cord #3 over cord #4.


4- Place cord 31 over cord #4 (which is now in the center)


5- Bring cord #3 over cord #1


6- Place cord #2 over cord #4


To continue, repeat from step 2 to step 6 as many times as necessary, pinning in place so that the cords will stay in desired shape for a beautiful open braid.


...........................................
Read FREE Online!
From Stress to Joy
Best Blog Tips

Embellish it With Ropes--Faux Cabling 3

Best Blog Tips
We will now make two braids, each with three ropes. These are the simplest kind to make, especially when you want to add "something" to a project in the spur of the moment or are in some hurry to finish it. (By the way, the names for these braids are my own, and the way I make them is also my own, they don't come from any book or publication like this.)

Undecided Braid- Materials: Ropes of colors of your choice crocheted in advance. Pins Blunt needle to sew finished braid in place Yarn or embroidery yarn to sew through side loops of braid Measuring tape This is a 3 strand braid that goes from side to side, chaging from a right side braid to a left side braid on purpose, to make it a bit fancier.


To work this braid proceed as follows: Arrange three ropes at the top of your project, pinning them to the top, but leaving a portion of the braid unworked so that you can later on sew it underneath the lining of the bag. Center them well, use a measuring tape, if necessary to make sure they are centered. To braid do this: 1- Take the rope on the right and bring over the middle rope. 2- Take the rope on the leftt and place it over the new middle rope. 3- Take the new left rope and place it over the middle rope. 4- Take the rope on the right and place it over the middle rope. 5-Take the new rope on the left and place it over the new middle rope. Tighten the rope a bit. Tighten a bit. Repeat these 5 steps once more. Now comes the change: 6- Take the new middle rope and place it UNDER the rope on the left. 7- Take the rope on the right and place it OVER the new middle rope. 8- Take the new rope on the right and place it over the middle rope. 9- Take the rope on the left and place it over the middle rope AND the rope on the right. 10- Take the new rope on the left and pass it over the middle rope. 11- Take the rope on the right and plass it over the middle rope. Continue this way indefinitely. You can also make a longer braid that will encircle the middle of the bag and disappear behind the sewn sides, but for that, you must make your braid before you completely sew the bag.


Wanna Walk Down the Middle Braid- Materials: Ropes of colors of your choice crocheted in advance. Pins Blunt needle to sew finished braid in place Yarn or embroidery yarn to sew through side loops of braid Measuring tape This is a 3 strand braid that goes from side to side, chaging from a right side braid to a left side braid on purpose, to make it a bit fancier.


To work this braid proceed as follows: 1- Take the rope in the middle and place it over the rope on the left. 2- Take the new rope in the middle and place it over the new rope on the right. 3- Take the rope in the middle and place it over the rope on the left. 4- Take the new rope on the middle and place it over the rope on the right. Continue this way indefinitely until you get the length of braid you need for your bag or purse.


FREE online, the beautiful book on the life of Christ, The Desire of Ages see the comforting love of God like never before in these tough times!

Best Blog Tips

Embellish it With Ropes--Faux Cabling 2

Best Blog Tips


Let's start with the faux cabling. As I said before, instead of making the cables with dc or tr sts, you will be making them with previously crocheted ropes which you will then sew to the purse, tote, bag, etc., using the little loops the ropes have on the side of them. Using these ropes as stems of plants is often used in Russian Irish Crochet, but we will use them here in the form of Aran cables. They are easier and faster and can be an after-the-fact embellishment to aproject nearly completed which needs a little "something" to make it prettier.


Things to remember:


1- You should make your ropes twice as long as the braid you want to make, since
the braiding process shortens the ropes.

2- You can leave the end of your rope unfinished so that if you run too short, you can crochet the number of rows that will complete the length you need and then continue braiding.

3- Complete your braid by pinning it to the bag before you sew it up. Make sure you're happy with the results before you make them permanent!


We will start with a really easy 4 rope cabling: Rusty's Cable


Make 4 ropes in a color of your choice.


Pin the ropes to the front of the bag as follows, (leaving a little bit extra rope loose which you will sew to the insde of hte bag under the lining of it):


In our example, 1 made 2 ropes with Carrot and 2 ropes with Pumpkin.


1. Pin 1 rope at the edge of where you want to start your braid. Pin the other ropes beside one another.


2. Pass the 4th strand of rope over the third strand of rope, under the 2nd and over the 1st strand of rope. Consider now the third strand the 4th strand, now repeat the procedure you did before, pass that strand over the strand that is now the 3rd rope strand, under the 2nd and over the one that is now the 1st, continue in the manner until you have braided all your cable.


Note- If you do not have enough, rope, pin what you have done carefully and crochet some more until you have completed the length you want. If you have ropes that are too long, unravel them to fit. Remember to leave a little bit of an excess so that you can sew the ends of the braid to the inside of the bag under the lining to secure it well. Secure well to the bottom of the bag as well.


........................................................


Read FREE online, the beautiful book on the life of Christ, The Desire of Ages
see the comforting love of God like never before in these tough times!


Best Blog Tips

Embellish it With Ropes!---Faux Cabling 1

Best Blog Tips

I have been so busy that I had not had the time to continue with the tutorials but I'm back! We will begin a series of lessons dealing with faux cabling. We will be using crocheted ropes as the basis of the cables, which will be sewn to the purse, bag or tote you have already made, BEFORE you add the lining to it. The edges of the ropes will disappear under the lining and curve gracevully towards the bottom of the bag. This is, as our theme has been, an after-the-fact form of embellishment which you will add after you have completed the shape of your bag up to the point where you would start adding the straps, lining etc. You will be adding these ropes to decorate the front of a very simple bag, preferably with a squarish shape that will lend itself to a sewn rope without bulging or pulling. I don't know what would happen to a more difficult shape. You would have to make a sample to test. You can add the braids horizontally around the bag, or vertically down the front. You must make each cord twice as long as the bag you are going to braid. We will make a series of sample braids to give you an idea of how to do it. Testing will give you the results you will want. This is a wonderful embellishment alternative to make a run-of-the-mill-looking bag really special! We will start by learning the basic cord that you will be using to make these wonderful ropes. Notice that the ropes will have little loops on the side edges, those are the loops you will be using to sew the braids to the bag with a blunt needle. Basic Cord-Ch 2. Row 1- 1 sc in 2nd ch from hook. Turn Row 2- Insert hook in little loop that formed on the side of the sc and pull up yarn, you and complete sc. Turn. Continue repeating row 2 for the length of the rope you want to make.


Craftybegonia’s Crossed Cord This is my own cord, which I came up as I was just playing around with the basic cord. Ch 2. Row 1- Insert hook in second ch from hook and pull up loop, yo, make 1 sc as usual. Ch 1, turn. Row 2- Look at the side of your stitches, the very side edge of them, you see a loop that has formed there, Insert hook into that loop, pull up yarn, yo, pull up yarn through all loops on hook. Ch 1, turn. Row 3- Now you see a loop has formed on the side of the cord, insert hook in that loop, pull up yarn, yo and pull through all loops on hook. Ch 1, turn. Rep row 3 for cord pattern. First pactice making the cord until you have an even rope that you can braid and we'll start braiding!


....................................................................

Read FREE online, the beautiful book on the life of Christ, The Desire of Ages see the comforting love of God like never before in these tough times!
Best Blog Tips

Embellish it With Knots: The Dragonfly

Best Blog Tips

This dragonfly can be made in any color you want, just use two different colors that match well with the purse, bag or garment you are embellishing with it. It would also look cute also on afghan blocks!

Materials:

Red Heart worsted weight yarn Tea Leaf
Red Heart worsted weight yarn Spring Green
Crochet hook size H
Blunt needle
Scissors
Previous knowledge on how to make French or Colonial Knot (see previous tutorials that teach the knots. You will find them here:
http://craftypursenalityshoppe.blogspot.com/2011/01/texture-it-with-knots-french-knot-and.html)

Body-

With Tea Leaf, ch 11.
Row 1- 1 sc in 3rd ch from hook, and in each ch across. Fasten off, leaving long tail to sew with.

Wings-

Skip 3 sc, join Spring to 4th sc, ch 10, sl st in same sc, fasten off, leaving long tail to make knots with.
Skip 1 sc and repeat wing on next sc.
Rep two wings on opposite side.
Thread needle and sew center of body to the crocheted fabric you want to embellish with a running stitch or any stitch you are comofortable with. Fasten off.
Thread needle and sew the wings onto the crocheted fabric, fasten off.
Thread needle with Spring Green and make a row of 4 French or Colnial knots in a straight line inside each wing. Fasten off.
That's it! You have an easy dragonfly you can increase or reduce in size and add to purses, wallets, eyeglass cases, clothing, beanies, quilt blocks, etc.

...........................................
Read FREE Online!
From Stress to Joy
Best Blog Tips

Embellish It With Knotted Appliques---The Dog Rose

Best Blog Tips


If you have taken a look at all at Ondori publications you would have noticed that the Japanese enjoy using crochet-on-crochet appliques to enhance and embellish garments, purses, and other crocheted projects. I love roses, and a dog rose would be a perfect applique, so I have come up with this one, which we will embellish with knots at the center to make it even more original.

Materials:Red Heart worsted weight yarn Petal Pink
Red Heart worsted weight yarn Bright Yellow
Blunt needle
Scissors
Crochet hook size H

With Red Heart worsted weight yarn Petal Pink, ch 12. Sl st to join chain.
Rnd 1- 1 sc in first ch, 2 sc in next ch, *1 sc in next ch, 2 sc in next ch, rep from * around. Sl st to join rnd.
Rnd 2- Ch 4, 1 dc in same spot, *skip 1 sc, 1 dc, ch 1, 1 dc in next sc, rep from * around. Sl st to join rnd. (V-stitch round)
Rnd 3- Ch 2 (stands for 1 hdc), 4 dc, 1 hdc, in center of first V-stitch, skip next ch, *1 hdc, 4 dc, 1 hdc in center of the next V-stitch, rep from * around, sl st at the base of first ch-2 of round to join. Fasten off.

Repeat for as many dog roses as you want to add to your project.

Thread a needle with Petal Pink yarn and sew the dog roses to your project. Fastn off.

Center Knots- With Bright Yellow and blunt needle, make French or Colonial knots to fill the center of the dog rose. Fasten off.

Done!

If you have joined us at this level, please, take some time to go back and check out or previous tutorials where you will learn how to make the French and the Colonial knots, practice a bit with a scrap of crochet and then come back and make your pretty dog roses to embellish your bag, tote, top, cardi, afghan, purse or anything you like to use it for.

Here is where you will find the lesson on how to make the knots:

Texture It With Knots French Knot and Colonial Knot


Can A Saved Man Choose To Be Lost?
Best Blog Tips

Texture It With Knots! Heart---1

Best Blog Tips


There are many kinds of hearts you can make with knots. And I am sure that when you have practiced a little bit you will come up with your favorite way of making these. I will try to share two with you that are of my own design. Think of how pretty a black purse or tote would look full of bright hearts made in different shades or red, dark pink and orangey-red all formed by texture-rich knots! That will also be unusual and different, because you will be making these after you have already made the purse, but before you add the lining and the handle. Also, if you are making a garment, you can make a couple of rows of these along the bottom of a top (also the sleeves), etc. Endless ideas will come to your mind as you work with these.

If you have joined our tutorials just now and do not know how to make the French Knot or the Colonial Knot, please go back and check out our past lesson. Practice the knots and then come back so that you will be able to attain satisfactory results with your stitching.
Here is where you will find the tutorial you need to see:
Texture It With Knots French Knot and Colonial Knot


For those of you who have been following these tutorials and already practiced the stitches, let's go on. I have enlosed a chart for you to guide yourselves.
Materials suggested:
If working on a yarn purse or garment, you can use the following yarn suggestions, if you are working on cotton, use Pearl cotton or embroidery floss, Practice on a scrap for thickness of knot and effect you would like the achieve.
For the sample, I used the following reds:
Red Heart worsted weight yarn Ranch Red (darkest shade)
Red Heart worsted weight yarn Cherry Red
Red Heart worsted weight yarn Hot Red
I used a blunt needle because I used yarn, if you will be working with Pearl cotton or with embroidery floss, use an appropriate needle.
Scissors
I cut a 30" length of Ranch Red yarn to make the first heart. As you work you will be able to gauge better who much you will need. I don't like my knots to be too tight because they look too small. Look carefully at the chart because it will be your guide. Each square of the chart represents 1 sc stitch of crocheted fabric on your purse or garment. The knot I chose to use was the French knot, and instead of making 2 wraps, I made 3 wraps for added thickness of the knot.


Following the chart, make the first knot by coming out through the fabric at the center of the sc stitch (right underneath the vertical loop that all backside sc stitches have) that is the easiest way to guide your stitches when you are a beginner. Holding the needle behind the yarn, wrap 3 times, and then go back into the crocheted fabric by inserting the needle not at the place where you came out at the beginning, but right in between that stitch and the previous stitch. pull your thread through, straighten out your knot. Make a knot the same way in the center of the nect sc.
Skip 3 sc, make 1 knot in each of the next two sc. Come back out on the row below, 1 sc to the right of the last one you just made and following the chart again, complete 1 knot in each of the following 4 sc, counting from right to left. Skip next sc, 1 French knot is next sc. Take thread to back and fasten off. Cut 46 inches of Cherry Red. Thread blunt needle and work 1 French knot in each of next 3 sc as before, moving from right to left.
Come out in new row, still following your chart, and make 1 French knot in first sc right underneath the last Cherry Red knot made. Continue maing 1 French knot in each of next 8 sc. Take needle to the back. Fasten off. Cut 30 inches of Cherry Red and thread a needle again.
Come up from the back and make 1 French knot in each of first 7 sc of row right below the last one. Fasten off. Cut 92 inches of Hot Red. Thread blunt needle again, this time with Hot Red.
Make last 2 knots of row with Hot Red.
Next row, skip first sc and make 5 knots across. Go to the back and come up again in the next row. Skip first 2 sc and make 1 French knot in each of next 3 sc, skip all the rest. Go to the back and come up again in row below, skipping first 2 sc, make French knot in next sc. This forms the point of the heart. Go to the back and fasten off.
Note- When you pull your knots tight, do so carefully, so that you will not pull your knot all the way to the back! Make sure your knots are well shaped so that they will not unravel with use.
Practice in a scrap of crochet until you are very sure of your French or Colonial knots (they are interchangeable) then go for it!
Following the chart, continue with Hot Red, making 1 knot per square on the chart, until you are done with the heart. Fasten off. I added a couple of knots to my heart to make it chunkier because of the photo, but you can make a pretty heart following just the "x" stitches in the chart.
You just made your first heart! Practice until you can make them with your eyes closed. Then you can adapt them and make them with a hollow center, or make them with less rows. You can make a string of heart or even chanve the direction in which the hearts point.
We will make one more heart in our next tutorial.


...........................................
Read FREE Online!
From Stress to Joy


Best Blog Tips

Texture It With Knots! The French Knot and the Colonial Knot

Best Blog Tips

We will begin today to learn a series of knots which we'll later use to embellish appliques to purses and garments. We will embellish a heart, a dragonfly, a flower, and maybe some other things. Not in that order! But first we need to learn two different knots. You will find, as you learn how to use them, that later on, you will venture out on using in other ways than these (I want to encourage you to use your imagination and creativity, that's part of the joy of crafting!) As you get more familiar with embellishing, and more secure at it, you will branch out to use these techniques to come up with your own designs and enjoy it thoroughly!

You can use these knots as we will in these tutorials, but you can also use them to form other things. For example, if you are working on a baby bag or on a baby blanket or baby cardi, and you would like to add a dolly applique to the item, you can work the dolly's hair with these knots. If you want to make an A B C or a 1-2-3 bib, you can crochet the letters, and sew them as appliques and then embellish them with these knots, either by edging them with the knots or actually filling the crocheted letters with them, to give them texture and originality. You can also use the knots in stripes every 2 or 3 rows. If you are making a shopping tote, and would like to add clusters of grapes to it, you can make those wonderful Irish-crochet leaves and then form the grape clusters with these knots. Little lambs, the centers of sunflowers, lilacs, fluffy clouds, raspberries, mums, and many other things can be "shaped" with these knots. Really, your imagination and creativity is really the limit!

Today, we will learn the French Knot and the Colonial Knot. You can choose to learn both knots or jsut one of them. They can be used interchangeably for your projects, or you can use both at the same time to embellish our projects!

The French Knot
This is the most common of the two knots we will be learning. This is the knot that first comes to mind when people think of making something with knots.
To practice these two knots you will need the foillowing:

A piece of crochet of a comfortable size for you to hold (a solid sc granny square block would do)
1 blunt needle if using yarn or an embroidery needle if using Pearl cotton or embroidery floss
pearl cotton or worsted weight yarn in your choice of colors
A pair of scissors

I will be showing you the stitches in yarn because they will show larger and you will be able to see them better, but even if your item is made in yarn, you can make these knots in embroidery thread or in pearl cotton, or even in crochet size 10 cotton, to create an effect and a contrast in textures. It is all up to the idea you have in mind.

To make a French Knot, thread your needle, bring the needle to the front of the crocheted fabric, now, hold the thread up with the opposite hand (the one not holding the needle), place the needle right under the working thread and wrap the yarn or thread around the needle twice. Push the needle into the crocheted fabric back down as close as possible to where you came out, (not in the same spot, just as close as possible to it.) Now, holding on to the working yarnor thread, pull your needle through the center of the knot, guiding the yarn or thread as you go so that it will not tangle, until you have almost no yarn or thread left. Then, let go of it and let it all desappear on the other side. You don't want too much tension on the thread, jus enough to keep a good shape on the knot and so that the needle can pass through the center easily, without having to force it down.


We will also learn another knot, the Colonial Knot. This is also a pretty knot to use in may ways. You can exchange the French Knot for it or
viceversa in any project you want to embellish.


The Colonial Knot

To make a Colonial Knot: Thread your needle with either yarn or thread. Come up through the crochet fabric with your needle. Now, form with the working yarn or thread the shape of a backward letter "C", ley your needle down against the "C" just formed with the working yarn or thread, wrap the working thread around the needle to form a figure "8", then, while holding the yarn or thread down, bring the needle down into the crocheted fabric very close to where you came up (not in the same hole, just right next to it), keep a soft tension on your working yarn or thread as you push the needle through to the back side of the crocheted piece.
pull through the center of the knot, hoding on to the working yarn or thread until only a little bit is left, let go and make it disappear down the center of the knot.


If there is time, later, I would like to teach you a couple more knots that you can also use together with these two or interchangeably in place of these two.


But for now, practice these two knots until you get them down, and we will move on to embellishing with them!


Read FREE online:


Rendezvous in Space!

Best Blog Tips

Texture It With Knots! The Bullion Rose!

Best Blog Tips


Materials:
If you are making these rosebuds as an all-over after-the-fact embellishment on a bag, and you used yarn for the bag, you can use yarn for the rosebuds.
If you want a contrasting fiber, you can use Perle or pearl cotton for the rosebuds.
Suggested colors: DMC Pearl Cotton Thread, Size 3, 16 yds. (15m)
Very Dk. Shell Pink
Rose
Very Lt. Shell Pink
If you want to use yarn, use the following colors:
Red Heart Shocking Pink or Country Rose
Rose Pink or Pretty 'N Pink
Baby Pink or Raspberry


Choose where you want your stitch to go on your bag or garment, bring the needle through from the back to the front at that spot, then you insert the needle a few stitches below that, and bring the needle up near where you oribilaly brought the needle through to start up,
then you wrap the yarn around the needle (if you are using yarn, wrap 10 times, if you are using embroidery thread, wrap 15 times. Not too tightly so that you can pull the needle through!) Pull your needle through, tighten it up a bit and to anchor it in place, pull your yarn or thread through to the other side.
For second side of center, bring out needle a little bit under the bullion just made, then, insert needle through beside the bullion stitch just made and make a bullion with 8 wraps. pull needle through, tighten stitch and ancor it in place. Fasten off on the wrong side. Thread needle with Pretty 'N Pink, if using yarn.
If using Pearl cotton, thread needle with Rose. Starting right underneat the darker center, bhering the needle through, then stitch above where you stitched the last bullion, to make this petal longer than the last one, make 12 wraps, pull needle through, tighten stitch, and anchor it.
Repeat this last stitch on the opposite side but make 14 wraps instead of 12. Pull through, tighten stitch. Ancor sittch and fasten off.
Thread needle with Baby Pink of with Very Lt. Shell Pink, if you are using Pearl cotton. Make a small Bullion of 8 wraps underneath the center rosebud already made. Pull through and tighten. Anchor stitch. Make another bullion on the opposite side with 8 wraps. Pull through and tighten. Anchor stitch.
Make another bullion a little bit above that one with 8 wraps. Ans another one on the opposite side a bit above the last one with 10 wraps.Make a tiny bullion across the top with 6 wraps. As always, pull needle through wraps, tighten, then anchor stitch.
Then go a little bit inside the top of the rose and make another 6-wrap little bullion. Pull needle thorugh, tighten stitch and anchor it.
Finally, make a small, 6-wrap bullion onthe side of the rose, (You can continue for as long as you want to and make the rose as large as you want to, but we will stop with a small rose.)
Once you have made your rosebuds, you can add little crocheted leaves (if you want to). Use Red Heart worsted weight yarn Tea Leaf or if you use pearl cotton, make leaves with Med. Pistachio Green.
For this one I decided to make 2 bullion leaves, one a bit to the side of the bottom and one above the last petal.


Christ's Human Nature
Best Blog Tips

Texture it With Knots! The Bullion Rosebud!

Best Blog Tips


There are as many kinds of bullion knot rosebuds as there are designers. i will be sharing with you my own. It is a very simple rosebud, you can make it a bit more complex by adding mroe petals to it, and i give you the suggestion of colors you can use to add to it.
This is a lovely techinique to learn to embellish crochet. You can add it to purses, clothing (especially tops and little girl's dresses),b ut you can also use to it embellish beanies, gloves, belts, the front of ponchos, totes, coin purses, and more!

Materials:
If you are making these rosebuds as an all-over after-the-fact embellishment on a bag, and you used yarn for the bag, you can use yarn for the rosebuds.
If you want a contrasting fiber, you can use Perle or pearl cotton for the rosebuds.
Suggested colors: DMC Pearl Cotton Thread, Size 3, 16 yds. (15m)
Very Dk. Shell Pink
Rose
Very Lt. Shell Pink
If you want to use yarn, use the following colors:
Red Heart Shocking Pink or Country Rose
Rose Pink or Pretty 'N Pink
Baby Pink or Raspberry


Choose where you want your stitch to go on your bag or garment, bring the needle through from the back to the front at that spot, then you insert the needle a few stitches below that, and bring the needle up near where you oribilaly brought the needle through to start up,then you wrap the yarn around the needle (if you are using yarn, wrap 10 times, if you are using embroidery thread, wrap 15 times. Not too tightly so that you can pull the needle through!) Pull your needle through, tighten it up a bit and to anchor it in place, pull your yarn or thread through to the other side.
For second side of center, bring out needle a little bit under the bullion just made, then, insert needle through beside the bullion stitch just made and make a bullion with 8 wraps. pull needle through, tighten stitch and ancor it in place. Fasten off on the wrong side. Thread needle with Pretty 'N Pink, if using yarn.

If using Pearl cotton, thread needle with Rose. Starting right underneat the darker center, bring the needle through, then stitch above where you stitched the last bullion, to make this petal longer than the last one, make 12 wraps, pull needle through, tighten stitch, and anchor it.
Repeat this last stitch on the opposite side but make 14 wraps instead of 12. Pull through, tighten stitch. Anchor stitch and fasten off.
If you would like to make a couple of more petals, repeat the last 2 petals right beside the ones you made last, but using the pale pink yarn or thread.

Once you have made your rosebuds, you can add little crocheted leaves (if you want to). Use Red Heart worsted weight yarn Tea Leaf or if you use #10 cotton, make leaves with Frosty Green. Or you can make a couple of Bullion leaves using Tea Leaf if you are using yarn or Med Pistachio Green, if you use Pearl cotton, use Med. Pistachio Green.

If you came in just now and do know how to make the Bullion Knot to begin with and are interested in learning to use this technique, go back to our previous class and learn it, then come back and try the rosebud.
Here is where you will find our previous tutorial:

For our next class, we will complete a Bullion Rose.


Born in Bethlehem

Best Blog Tips

Texture It With Knots! The Bullion Knot

Best Blog Tips


Now, if you don't want to make puff balls, or if you already used the puff balls and would like to use another kind of embellishment to create texture, use knots!
We will be making different knots, so you will learn to make them and by eaither scattering them all over your project or using them to follow a design of your own invention, go for it! This and the following classes will enable you to use decorative knots from now on.

Let's start with the Embroidery Bullion Knot.
You know Bullions from crochet, the embroidery bullion is pretty similar, but you can add bullions to your project after the fact, by using embroidery bullion knots.

You can add them in a pattern of your own choosing, you can scatter them all over, you can add them horizontally or vertically, and you can curve them like semi-circles.

You can use yarn on yarn, tone on tone, or contrasting colors and a different thread from the yarn used for your purse, bag or garment. For example, you can use Perle embroidery cotton, you can make them with a #10 cotton thread, you can use metallic thread, you can use satiny rayon thread, variegated embroidery thread,etc. The possibilities are almost endless.

This particular knot is also known as a caterpillar stitch or a coil stitch because you can use it as coils in a decorative manner. It all depends on how many times you will wrap the thread or yarn around your needle, if you do it say, 20 times, you will have a longer bullion and you can arch it a bit and turn it into a semi-circle.
Usually, you will wrap 15 times and you will get a straight bullion. If you would like to have an interesting effect with this thread, you can use 3 or 4 contrasting embroidery threads threaded through your blunt or embroidery needle. This stitch can be used a s a powdering, here and there as an accent, or you can mass it together, thus making a very dense textured filling following a pattern of your own invention; you can work it closely together to form a textured outline to other motifs you may want to sew onto a piece or just use it to add interest an a splash of color and a surprise where you would like it.

Before you begin, you have to decide whether you want the bullion to lie straight or if you want it to curve (for it to curve you only need tomake it longer and add mroe wraps to the needle). As with everything new, please, practice with a scrap piece until you are confindent with the stithc and then add it to your project to embellish it!

To work your Bullion proceed as follows, insert the needle into the crocheted fabric where you want it, from back to front, insert the needle again a little bit further, as far as you want theBullion to go, and without pushing the needle through the crocheted fabric all the way through, wrap the thread or yarn around the needle, 10 to 12 times for yarn or thick thread, 15 to 20 times for very fine embroidery thread or fine cotton crochet thread, not to tightly, because it will make it hard to pull the needle, and pull the needle through the wraps. Pull all the way till all the thread has gone through the curls of the wraps and all you have left is the Bullion.
To anchor the stitch, bring the needle to the back at the spot where you started.


Born of the Lineage of David
Best Blog Tips

Yo-Yo It!

Best Blog Tips


Materials:

Yarn of your choice

Scissors

Blunt needle

Crochet hook size H

Yo-yos are easy to make and are a fun way to embellish a piece of work. You can make them in a variety of contrasting, vivid colors against a dark ground (black, coffee, chocolate brown, burgundy or navy, to give you just a few examples. A dark slate gray will also work) or against a white, creamyu or light beige, or even a pearl gray.

On the other hand, you can use them tone on tone, just to add texture to the item you are making and mobility (if you choose to let them hang a little more) that is flirty and fun.

For example, for a shawl, you can add the yo-yos to the last 2 rows of your shawl as a substitute for tassels or a fringe. If it is a cardi, you can do the same or sew them all over a bag or large tote! You can also sew them in rows, leaving a space in between for a fun effect, similar to a moving fringe. Like colored, hanging coins, they will add motion to the garment or the purse.

Make your yo-yos all by themselves, either in the same yarn and color of the item you intend to sew them to or in contrasting colors or even texture to the item they will be embellishing.


Make your yo-yos as follows:


Leaving a tail at the start, ch 4, sl st to form ring.
Ch 3, work 16 dc in ring. Sl st to join rnd. Fasten off, leaving long tail.

Continue to make your yo-yos until you have the amount you have decided to use according to the kind of effect you want to achieve (an overall effect of adding them randomly all over the garment or bag, section embellishment, by just adding them in rows or just to a certain area of the garment or purse.)

Attaching your yo-yos:


Thread a blunt needle with one of the tails you left over and use that tail to sew the yo yo tothe garment or purse. Fasten off. Do the same with the other tail. You can sew the yo-yo closely to the garment or bag or leave bit of the yarn hanging for the yo-yo to have mobility.


Have fun with yo-yos! You can use them to embellish the front of a top or even the edges of a scarf. You can add them to the edges of a wrap or pile them up to form almost like a faux fur-like "collar" for a cardigan or sweater.


Variations:


You can make yo-yos in eyelash yarn, so that they'll have the feel of moving, round fringes!


Hope you enjoy trying out these ideas!


This is a beautiful time of the year, when humans beings stop and think of others. This is also a verylonely time of the year for many. If you can, stop and make something beautiful for someone who is alone in the world, someone who has been forgotten by people but not by god and you will be greatly blessed!


Rendezvous in Space!


Free Christmas Clip Art Images
Best Blog Tips

Embellished Crochet Academy Lesson 2: Rick Rack

Best Blog Tips


Last week, we used Puff Balls to embellish a bag, tote or garment that needed a little "more" after it was finished. This week, we will try our hand at rick rack. Rick rack can be very useful, you can use its valleys and peacks to "hang" a lacy ruffle, you can use it as is to just edorate around your bag or garment without having to unravel a single stitch to sproce things up.


Here's a simple rick rack you can make, which is very flexible and can be used in various decorative ways:


With yarn of your choice and H hook, ch 3.


Work 3 hdc in 3rd ch from hook. Ch 3, make 3 hdc in 3rd ch from hook. Rpe until you have the desired length.


How to use it:


You can sew this rick rack to your bag or garment in various ways, using it as is, or you can bead it or sew a decorative pearl or button to each "peak" of the rick rack.


You can make 2 rows of rick rack in contrasting colors of yarn or thread (depending on the project and the time of the year) and sew them with the peaks either facing away from each other of 1 up, 1 down, or all facing one another. This rack rack is very, very flexible and you can turn it easily in whatever direction you like.


You can sew it either forming two horizontal rows around a bag or the front of a grament, or two vertical rows.


You can also sew them in a V or U shape or form a half square, leaving the top opened and fill the inside with beads or buttons of any size. Even giant buttons look good.


You can also form a heart shape or a diamond with it. Simply, pin it down in the shape you have in mind and sew in place. If you form a heart, for example, you can eaither leafe it as is, or fill the hollow center with beads or buttons.


This will give a fresh look to your a favorite pattern for a bag, tote, purse or garment.
.................................................
Precious Thought:
" 'I know the thoughts that I think toward you, saith the Lord, thoughts of peace, and not of evil.' This the message that, in the light from the cross, may be read upon all the face of nature. The heavens declare His glory, and the earth is full of His riches." Lift HIM Up, 255.
Best Blog Tips

Embellished Crochet Academy Lesson 1: Puff Balls

Best Blog Tips

Embellished Crochet—After The Fact Embellishments: Puff Balls


This course is for those who have a favorite pattern that they can make in a jiffy, almost with their eyes closed. A pattern they love and would make over and over again, if only it didn’t look the same! There is a solution to that and this course offers you many ideas you can apply to your simple patterns to spruce them up and give them a different touch, taking from the that “sameness” that has stopped you from repeating them till now! But it is not restricted only to bags. The embellishments you will learn can be applied to a variety of crocheted items such as tops, cardigans, shawls, hats, and many more! As many as your imagination and creativity lead you to use them on. Once you have learned these embellishments, you can work out your favorite patterns and just embellish them at the end.

So let's assume you have just finished a tote bag using your favorite pattern and you want to make it look different. Puff It! This is especially fun if you are making two or more of the same pattern and want to make each bag turn out different.

Let's Puff It Today- You already made your bag, (have not lined it yet) top, beanie, beret, scarf, or cardi, but you want to add "something" to it, so let's "puff" it!
You can make tone on tone puffs, or use a variety of contrasting colors, or you can make all the puffs the same color but of a color that contrasts beautifully with the bag or garment. You can also use a texture (novelty yarn,funfur, eyelash yarn, frisee or boucle yarn of your choice)or you can make them in pure wool (even if the original purse or garment is in acrylic yarn)and needle felt them before you add them for a different effect.

Materials needed:Yarn of your choice
Finished purse, tote, bag or garment
Blunt needle
Scissors

Make the Puff Balls as Follows:

With yarn of your choice and H hook, ch 3.
Work 5 dc in 3rd ch from hook, leaving last loop of each dc unowrked on hook, yo and pull yarn through all loops on hook. Move all the dc towards the back to form a ball, turn the puff around and look below it. You will find what is rest of the foundation loop where all the dc where made, insert hook there and make a slip stitch. Fasten off, leaving long tail to sew your puff with.

Repeat this procedure until you have all the puff balls you want to add to your bag or garment. When you have all the puffs you want done,thread a blunt needle with the tail you left when you finished each puff and sew them to the bag or garment one at a time where you want them.
You can scatter them all over your project or place them only at the bottom or center of it. For example, if you are using them to embellish a beanie or beret, you can crowd all your puffs aorund the center top of your beanie or beret. It you want to use them to embellish a scarf, add to the bottom ends of it. If you want to dot a purse, bag or tote, you can use them all ovedr or just down the front in a vertical line, around the bag on a vertical swath, you can use them only at the bottom on a thick row, you can also use them to worm a pattern linke a zig zag. The uses are as endless as your imagination!
If you want them for a cardi or top, you can place them at the bottom and edge of sleeves, down the front, as a horizonal line around, dotted all over, and in any way you want it!
You can use the tufted feel by making your puffs of funfur. Follow your creativity!


If you wish to contact me concerning one of the lessons of the CAL, please do so using the form below:


Name:

Email:

Comment:


If you would like to contribute your photos to the Academy, use this form to let me know and I will sen dyou an email address where you can send me your pics, for me to post them with your name, and whatever info you would like to add.

Precious Thought:

"Let the tenderness and mercy that Jesus has revealed in Hiw own precious life be an example to us of the manner in which we should treat our fellow beings." ---My Life Today, 235.

Best Blog Tips
