Showing posts with label purse strap. Show all posts

Helen's Strap

Best Blog Tips


This is a pretty easy to make purse strap, it is quite lovely if you make it in two colors, so that the loops will show more. Sew the ends to purse rings and you're set!
Materials-
Worsted weight yarn of your choice (I used Red Heart) in at least 2 different colors (for the sides), I chose to make it in 3 different colors for effect.
Crochet hook size H.
Scissors
Pins
A surface to pin your ropes to while you loop (it could be a pillow or a piece of cardboard)

As usual, we will start with two crocheted ropes. Please refer to our tutorial on how to make them.
You will find it here:
How to Make the Crocheted Ropes
Your ropes can contrast or match your bag in any combination of your liking.
To start, make your ropes. Pin them to the top of your working surface or pillow.
Step 1- Take rope #1, the one that is to the left and bring it to the front of rope #2, then around that rope to the back of it and then pass it over the little curve that formed as you went around, and bring it back to the front again.
Step 2- Now take rope #4 (the one that lies first to your right), bring it to the front of the middle rope (rope #2), around it toward the back and then
bring it to the front again, passing it over the little curve that forms on the side as you work. Tighten a bit.

To form your strap, repeat step #1 and step #2 alternately for as long as you need to to form the length of strap you want.
Fasten off, and sew ends to purse rights.

Done!

If you want to, you can make the loops a bit more loose to allow the middle color to be seen. But if you make them tight, you will have a nice, strong strap that you
look very nice pretty rings in a small purse with pretty as a substitution to a more expensive wooden handle. It also makes a strong strap for a large tote bag.


..........
A Courageous Attitude. . .


Best Blog Tips

Jasmin's Strap

Best Blog Tips


This strap is very, very easy to make and it looks cute on a large tote. It is a knotted strap. You can make it with cords of a single color to match your tote, or if you work like me, in many colors, you can tailor it to the color palette you used to make your bag.

Materials-
Worsted weight yarn of appropriate color to make your cords
Crochet hook size H
Scissors
Pins
Purse rings
Pillow or piece of fabric to pin your cords to for stability when knotting

To learn how to make the Basic Rope to make this strap, please go here:Basic Rope Tutorial

Make 4 cords in the colors you have chosen for your bag.
Pin the cords to a pillow, to allow you to work more freely.
You will working in pairs as follows:

1- Bring first rope on the left to the front of second rope to the left, move the end of the rope to the back and around the second rope, and through the loop that is formed, pull to tighten.
Repeat for the second part of the knot.
Now, working on the opposite side, bring first rope to the right in front of second rope to the right, take it to the back of the second rope and then through the loop that forms. Repeat for the second part of the knot.

2- Repeat step #1

Leave a little bit of slack so that the colors will show. And now, let's work the center.

3- Bring second rope to the right in front of second rope to the left, around the rope towards the back, and then through the loop that forms. Repeat to form the second part of the knot.

4 and 5- Repeat step #1, twice.

Alternately repeating this process for as long as you need to, will form your strap. Wasn't that easy?

..........

Broken Toys
Best Blog Tips

Naomi's Braid or Purse Strap

Best Blog Tips


This braid or strap is a colorful and easy way to add interest to a common-looking and otherwise drab little tote or bag. If you have made a large bag and it looks a bit dull, even with bright colors and seems to be missing "something", why not add one of these fun and attractive straps? You will find a few nice ones in this blog.

To learn how to make the crocheted ropes, please search for the tutorial about them by using the Search box at the right hand side of this blog post.

Make 4 crocheted I-cord ropes of different colors contrasting or harmonizing with the color or colors of your bag or tote.
The ropes will be more attractive if they are not made all the same color, it will also be easier for you to keep track of where
the ropes go, when you're a newbie at this.
Leaving at the edges to the braid a bit of free rope so that you can easily sew the finished braid to the purse rings once you are done, proceed as follows:

1- Pass rope 4 under rope 3 and then bring to the front over the same rope, and towards the back over itself, forming a loop. Tighten. Repeat again.
Repeat the same procedure with rope 1 and rope 2, twice.

2- Cross the two middle ropes over each other, left rope over right rope. Place the ends behind the two side ropes.
3- Cross the side ropes in the middle, the left rope over the right rope.
4 and 5- repeat steps 2 and 3 twice.
6- Repeat step 1.

Continue repeating these steps for the length of your strap. Sew ends to a purse ring and you're done!


.................
Bible Universe
Best Blog Tips

Cynthia's Purse Strap or Handle

Best Blog Tips

An interesting and pretty purse handle or strap can add interest to even a common-looking tote or bag. This one's pretty easy and you can use it to liven up any bag!

Color is key in a rope strap. You can make the strap in contrasting colors or in different hues of the same color of your bag.
Make 4 crocheted cords (please, use the search box in this blog to find the tutorial on how to make ropes) in 4 different colors, this way you will be able to follow the tutorial , the more easily.

Pin the ropes to a pillow or a piece of cardboard with some fabric on top to avoid soiling.
To make the braid proceed as follows:

1- Place rope #4 over the two central ropes and under rope #1.
2- Bring rope #1 under the two central ropes and out over rope #4. Carefully, tighten up a bit to
pull up the beginning of the knot.
3- Bring new rope #1 under the two central ropes and over rope #1, bring rope #1 over the two central ropes and under rope #4. Tighten up a bit. You just formed a square knot.
4- Bright rope #1 over rope #2, rope #4 over rope #3, bring the two new central ropes over one another, the left one over the right one. Bright the two ropes at the edges over the two central ones, and cross them one over the other as before. Bring the ropes that are now at the two edges to the center over the other two and cross them as before.
5- Repeat a square knot.

Alternate rows 1 to 5 until you have the length of strap you need. When you finish, sew ends to purse rings. Fasten off.

...................
Bible Universe
Best Blog Tips

Betsy's Woven Purse Handle

Best Blog Tips


This is one of the easiest weavings to make for a pretty purse or bag handle.
Make 3 crocheted ropes in 3 different colors which either contrast or harmonize with your bag, tote or purse.
Make them a little bit longer than you think your need them, to allow for the twisting and weaving, but leave one end
attached to the ball or skein, just in case you need to add more length to complete your project.
Attach the finished end of each rope to a pillow or something that will allow you to do the weaving without the ropes moving all over the place. The rope that will weave through the twisted ones, if still attached to a ball or skein, must lie on the
opposite direction than the others, otherwise, the ball or skein will not permit you to pass the rope through the twists.
To make the woven braid, proceed as follows:

1- Attach first two braids. Then twist them over each other, pin down to keep them in place.
2- Take weaver rope and then pass it over and under in between the middle of the twists.

Once you have the desired length, sew to a purse ring and you have a pretty embellished strap for your next purse, tote, or bag!


When You Need to Have Strength. . .
Best Blog Tips

Marly's Braid or Purse Strap

Best Blog Tips


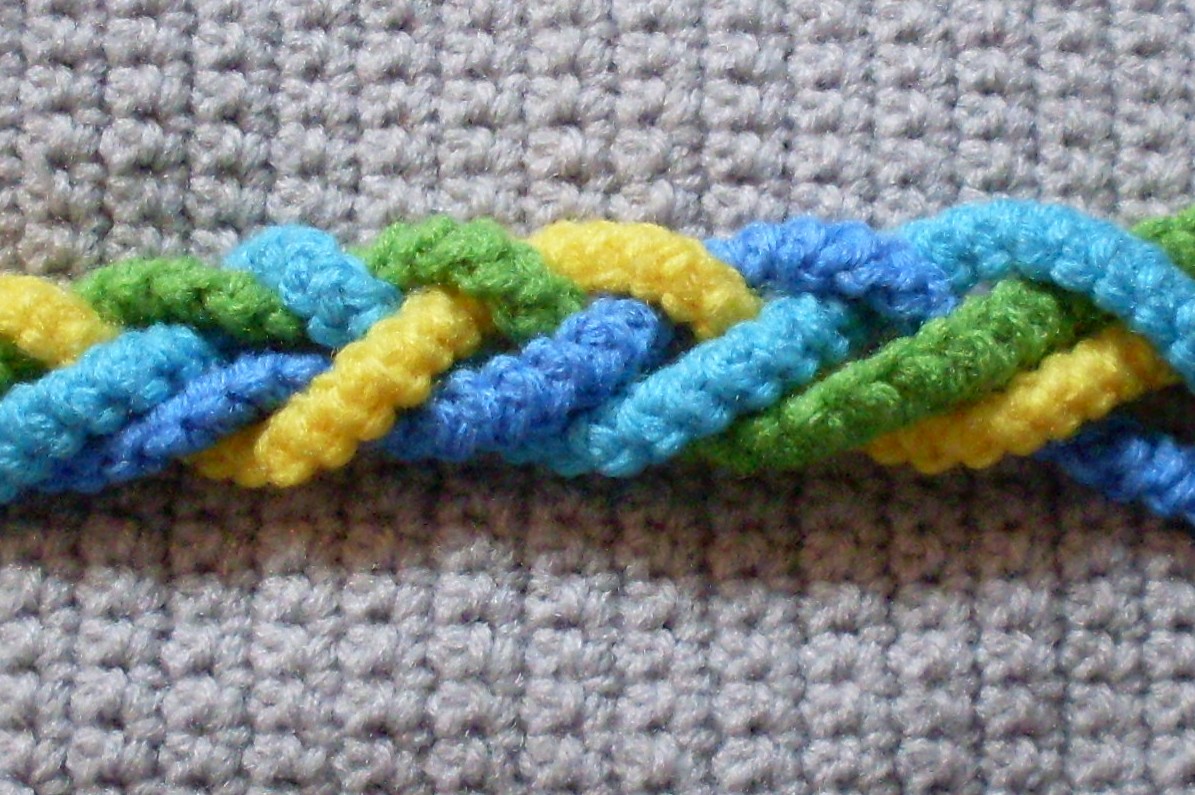
This pretty braid can be used either to embellish a purse or a tote bag or for the strap of the bag. To make this easy but pretty braid, make 4 ropes in different colors, I used Red Heart yarns because they are easily found by all, the colors I chose, if you happend to like the color combo, were:
Bright Yellow, Delft Blue, Turqua (to get a nice aqua shade)and Spring Green, for the MacIntosh apple tone (please refer to previous tutorials to learn how to make the ropes.)
To make the braid proceed as follows:Pin the ropes to a pillow or to a piece of cardboard (with a piece of fabric underneat to keep the braid clean) to make it easier for you to make the braid.

1- Cross rope 3 over rope 2.
2- Without bringing the to the top, but moving them underneath the previously made cross, bring rope 4 and rope 1 to the center and cross rope 1 over
rope 4.
3- Cross tope 4 over rope 3 (bue over aqua) and rope 1 over rope 2 (green over yellow).
4- Cross rope 3 over rope 2 (aqua over yellow).
5- Bring Blue and green ropes to the center, underneath the other 2 ropes. Cross blue over green rope.
6- Bring the other two ropes underneath the previous rope and cross the yellow over the aqua.
7- Cross the aqwua over the green and the yellow over the blue.
8- Bring the yellow and the aqua underneath the other two ropes and cross them.
9- Bring the blue and the green under the yellow and the aqua and cross them.
Continue these steps for as long as you want to, thios will make a lovely braid for the front of a bag or a very striking handle for a bag!

When Things Go Wrong...
Best Blog Tips

Knotting A Strap--Festoon

Best Blog Tips


In Spanish, the call this knot the festoon, hence the name of this strap.
This is a technique borrowed from macrame that will yield you an easy, sturdy yet pretty strap or you can simply use it to decorate the front of a bag as we have done before with our braided ropes.
The benefit of using ropes is that you can sew them together at the ends, bend them around a purse ring, sew them to secure tem to the ring, and you're done, whereas, with the original macrame technique you're dealing with strands of yarn and it is a bit more involved to secure the ends to make them workable.
If you're going to use it to festoon around a bag or as a nice decoration going down the front of a bag, calculate a bit of an excess to go over the edge of the bag and be secure on the inside inside the lining, and secure well at the bottom of the bag with tiny well-placed stitches. If you are using the festoon for a purse or tote strap, you can even join a bit of yarn at the ends and picking up the loop at the end of each rope, crochet an sc in each and do a second row of sc to secure them together, so that it will be easier for you to sew the edges to a purse ring.

This is how to make this strap:

Measure your bag, and calculate double the amount of strap or festoon embellishment that you will need. As always, I advice that you leave the bottom portion of
the rope, still attached to the yarn, with a safety pin holding the last loop, just in case you need to make a bit more to complete your project, or to unravel some
to fit it in.

Pin 3 ropes in colors of your choice either to your bag or, if you're using them for a strap, to a pillow or a piece of cardboard.

1- Place the rope on the left on top of the rope on the middle, then behind it, then bring down, forming a loop around the middle rope. Tighten a bit. (First part of the festoon knot made.)
2- Place the rope on the left below the on the middle, then, bring the working end around, forming another loop going in the opposite direction to the one made before. Tighten a bit. (Second part of the festoon knot completed.)
4- Now repeat the first 2 steps with the rope on the right. (Fastoon formed)
Continue this way for as long as you want to to complete your festoon. You can make it tight so that the middle rope cannot be seen, but I think that letting it be seen in between knots adds to the pretty effect. Look at the photos for guidance.

...................
The Wonderful Love of God

Best Blog Tips