This frog closure is a lot of fun. It is very easy to make and really lovely. Originally, I made it to close a capelet (so it is versatile) but looks gorgeous as a closure for a large bag or tote, so I decided to share it here at our Embellish Crochet School.
Materials-
Worsted weight yarn
Crochet hook size H
Pins
Pinning cardboard or pillow
scissors
Blunt needle to sew
With Worsted weight yarn in the color of your choice and H hook, make an crocheted I-Cord rope 19" long. Fasten off, leaving long tail to sew with.
Fold the cord in half, matching the ends.
Cross the left end over the right one, forming a loop the size of the button you will be using. Pin in place.
Curl right rope's end into a circle, insert end into the circle and pull a bit, as if you were going to make a knot, but not tightening into a knot, but leaving spaces in between, (it will look like a pretzel) bring the end up to one side of the button loop (turn the knot you just formed around, so that the pretzel part will be to the bottom and the end of the rope to the top, bring the top to the side of the loop that will form the buttonhole) and pin. Repeat on the opposite side. Now thread blunt needle with tail and sew, to secure the ends in place. Finally, take out the pins and stitch the middle, where the loop was crossed, to keep the button from slipping out. Fasten off.
Sew frog to your bag, large purse or tote, leaving the buttonhole loop free.
Sew button in place and you're done! You just got a handsome way to close your new bag.
Your bag needs a pretty handle to complete its beautiful
look, why not make a lovely strap? You can save money and have an even more
unique bag in the end!
As all other rope-braids this one might look a little
complicated, but if you follow the instructions carefully, it is quite easy to
make.
Materials-
Worsted weight yarn of your choice in 4 different colors,
wound up into balls
Crochet hook size H
Scissors
Pins
A pinning surface (could be a macramé cardboard, a simple
strong cardboard or my favorite, a pillow)
Make 4 I-Cord ropes as we have taught in previous tutorials,
leaving one end of rope tied to the ball of yarn, in case you miscalculate how
much you need and need to crochet more rope. If you don't know how to make the ropes, please refer to
this tutorial:
Once you have made ropes (I suggest that you make them in 4
different colors that either match or contrast your bag nicely) proceed as
follows to make the strap:
Pin your ropes to your braiding surface (cardboard or
pillow) leaving the distance of about 2 sc in between them (a couple of
centimeters), you have to eye-ball it. If you use a cardboard surface, you can
make a small rule on top to help you out. I like to make a large square of
crocheted sc, and place it at the back to help me as a guide. You can do
whatever you like, this is not an exact science, so whatever you like will
work.
Mentally count your ropes as 1, 2, 3 and 4, from left to
right.
1-Pass rope 2 under ropes 3 and 4 toward the right.
2-Pass rope 1 over ropes 3 and 4 to the right.
3-Pass new rope 4 over rope 3 to the left.
4-Pass new rope 2 over rope 1 to the left.
5-Cross the two ropes that are now in the middle, the left one
over the right one, toward the right. Tighten a bit.
6-Pass new rope 4 over rope 3 to the left.
7-Pass new rope 2 over rope 1 to the left.
8-Take rope 1 and pass it under ropes 2 and 3 and over rope 4,
leaving a small loop.
Take rope 4, pass it over ropes 3 and 2, and through the
loop and over rope. Tighten a bit.
Take rope 4, pass it over ropes 2 and 3 and under rope 1,
leaving a small loop.
Take rope 1, pass it under ropes 2 and 3 and through loop to
complete the square knot.
9-Cross new rope 4 over rope 3 right to left, cross rope 2 over
rope 1, right to left.
10- Cross the two ropes
that are now in the middle left to right.
11-Repeat step #8.
Continue repeating Steps 3 to 8
for as long as you need to, until you have the length of strap you want for your purse or bag.
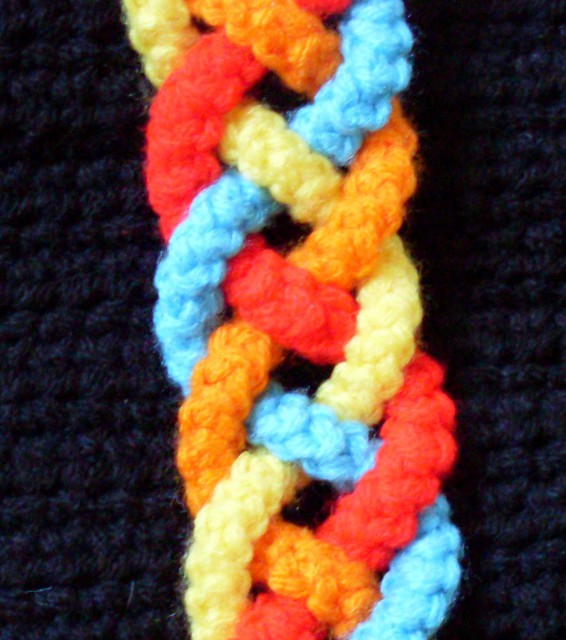
This is a lovely braid or strap made with 4 crocheted I-cord ropes, that can be used as an embellishment for the front of a bag or as a fun and colorful bag strap. If you decide to make it into a strap, calculate enough braid to fold over the purse ring that you'll use to attach the strap to your bag and sew on the back side.
This braid is based on the crochet I-cord, if you do not know how to make this cord or rope, please refer to this tutorial: How to Make Crochet I-Cord Ropes
Materials-
Worsted weight yarn of your choice in 4 different colors to match or contrast your bag
Crochet hook size H
Scissors
Pins
Pillow to pin ropes to for braiding
Measuring tape (if you need to measure length of braid to fit your bag)
Purse rings of choice (if using for a strap)
Make balls for each color you will be using. Work 1 rope or I-cord per color. Make each rope twice as long as the finished item.
Leave one end of the rope attached to the yarn in the ball, just in case you need more rope. Once you finish your strap, you can easily fasten off, but if you miscalculate and do not have enough rope and have severed the yarn, you then have to start all over again, whereas if you run out of rope before you're done braiding, you can easily pin the part you have braided to secure it and crochet the necessary length of rope and finish your strap or braid without a problem.
To make the strap, proceed as follows:
Mentally number your ropes 1, 2, 3 and 4, counting left to right.
1- Bend rope 4 over the 2 middle ones and place it under rope 1. Bend rope 1 under the 2 middle ropes and bring forward through the loop
that formed when you bent the first rope, tighten a bit. Repeat. (Do not tighten too much, let the colors of the ropes be seen.)
2- Pass rope 2 over rope 1, pass rope 4 over rope 3, and cross the 2 ropes that are now in the middle one over the other, left to right.
3- Repeat step 3.
4- Repeat step 1.
Repeat these 4 steps for as long as you need to to make your braid or strap.
There is an immense amount of variations to these beautiful straps, as many as the ideas you get for new bags, totes and purses, so experiment and have fun with them!
This is a pretty 4 rope braid that can be used as an embellishment for the front of a simple tote or large bag or as an
eye-catching strap. If you decide to make it into a strap, calculate enough braid to fold over the purse ring you will be using and sew on the back side.
This braid is based on the crochet I-cord, if you do not know how to make this cord or rope, please refer to this tutorial: How to Make Crochet I-Cord Ropes
Materials-
Worsted weight yarn of your choice in 4 different colors to match or contrast your bag
Crochet hook size H
Scissors
Pins
Pillow to pin ropes to for braiding
Measuring tape (if you need to measure length of braid to fit your bag)
Purse rings of choice (if using for a strap)
Make balls for each color you will be using. Work 1 rope or I-cord per color. Make each rope twice as long as the finished item.
Leave one end of the rope attached to the yarn in the ball, just in case you need more rope. Once you finish your strap, you can easily fasten off, but if you miscalculate and do not have enough rope and have severed the yarn, you then have to start all over again, whereas if you run out of rope before you're done braiding, you can easily pin the part you have braided to secure it and crochet the necessary length of rope and finish your strap or braid without a problem.
To make the braid proceed as follows:
Mentally number your ropes 1, 2, 3 and 4, counting from the left to the right.
1- Cross rope 2 over rope 3 from left to right, place the end of rope 3 over rope 1, and the end of rope 2 underrope 4, moving from left to right.
Repeat the same steps for as long as needed to complete your embellishing braid or fancy purse strap!
If you make bags or purses, you can never have enough strap ideas to "pretty-up" even the simplest project!
This is an easy way to do it.
Materials-
Worsted weight yarn in at least 4 colors
Crochet hook size H
Pins
Scissors
Cardboard or pillow to pin to
For this strap you will need 4 ropes, each of a different color. You will make them double the length that you want the final strap to be.
If you are unseru about what that length would be, before you start, make a ball of yarn for every single rope you will need, crochet from that ball and do not cut the yarn off the ball until you have made your strap, to make sure you will have the length you want. If you have too much, you simply unravel a bit, you you need some more, you simply make a little bit more.
If you need to learn how to make our ropes, please go here for the original tutorial:
Once you have your ropes made, pin them onto a cardobard or a pillow to be able to comfortably work with them. To make the strap, proceed as follows:
1- Cross the two center ropes, the one on the left over the one on the right. Now cross rope 4 over rope 3 and rope 2 over rope 1.
2- Repeat step 1.
3- Repeat step 1.
4- Bring the first rope on the left over the one next to it, bring end to the back and through loop that formed, tighten a bit. Bring first rope on the
left over the rope next to it, bring end to the back and through loop, tighten a little. Repeat these steps once more.
Repeat steps 1 to 4, as many times as needed, to form your strap until you have the length of strap you want.
If you make purses, you can never learn to make too many different purse straps! They give variety and interest to the simplest purse, especially if they are knotted or braided! Karielle is very easy to make, especially if you take the time to go through our previous tutorials! Note-
If you don't know how to make a rope, please refer to our tutorial that teaches how to make them. You will find it here: How to Make the Crocheted Ropes
Materials-
Worsted weight yarn in color or colors of choice
Crochet hook size H
Pins
Pillow or cardboard to pin to
Scissors
Blunt needle to sew
Purse rings
To make this strap, crochet 4 ropes, twice as long as the
length of strap you want, leaving 1 end of each rope attached to a ball of
yarn, just in case you need to make a bit of extra rope, or to unravel some, if
you miscalculated. That way, you will not have to start all over again.
At the beginning of the strap, leave about 1 ½ to 2 inches
of rope un-worked, so that you can bend over a purse ring and sew. Pin in place
so that ropes will not come off as you work.
Start rope as follows:
1-Take rope #1 (the one on the right), to the back and bend it
to form a loop. Bring rope #4 to the center, lay it in front, on top of the 2
center ropes and bend it to form a loop. Now, take the end of rope #4 towards
the back over the bend you made with rope #1, and bring the end of rope #1 from
the back to the front over the bend with rope #4, forming a knot. Slide it
upwards, tightening it gently. Repeat again.
2-Bring the right hand rope over the one just closest to it.
Cross the rope in the middle over the one on the left. Cross the two ropes in
the middle over each other, left to right. Repeat these steps for as long as
you need to form your strap.
3-Factor into your calculations, that you must leave 1 ½ to 2
inches of rope to sew onto the purse ring, plus about 1 inch more to make the
last granny knot.
4-So once, you have reach that point in your braiding, make a
granny knot as we did at the beginning and then, end your braid, leaving a bit
of rope at the end to sew around a purse ring.
This is a substantial but beautiful frog closure. It is recommended for a large bag or tote. You can also use it for a shawl or a vest. Unfortunately, a dark yarn does not do justice to the beauty of this frog, but I needed it in this color for a project for my mom, and decided to share it anyway.
Materials- Worsted weight yarn of your choice (I used Read Heart worsted weight Black) about 3 oz. Crochet hook size G Scissors Blunt needle Sewing thread of color to match your yarn Button of color to match your yarn Pins Pillow or cardboard to pin to
To make frog closure, proceed as follows:
Note- Before you make your ch 3 to start the rope, leave off a long tail, you will need it at the end of the project.
1- Make a crocheted rope 28 inches long. If you don't know how to make a rope, please refer to our tutorial that teaches how to make them. You will find it here: How to Make the Crocheted Ropes 2- Once you have made the rope, fasten off, leaving a long tail to sew with. 3-Measure and cut a piece of yarn of the color of your rope, 33" long and thread blunt needle with it. 4- Fold rope in half, matching ends. 5- Cross left leg of the rope over right leg, adjust to the size of the button you have chosen for your frog (this is the buttonhole). While holding it with one hand, turn it to the wrong wide and with the blunt needle, make some stitches on the wrong side to secure the buttonhole loop (don't worry, the back of the frog closure will be sewn onto your project anyway and won't show.) Fasten off beginning end, and secure at back of rope, you can even pull the little knot into the rope and make it disappear there. What you want is to make sure that your closure will not fall apart with use.Leave the rest of the yarn in the blunt needle. At the back of the rope, make a stitch that will bring the remainder of the yarn to the very center, between the two legs of the rope that are hanging. Take the yarn out of the needle. Now, pin the buttonhole loop to a pillow or to a piece of cardboard so that the piece will not be moving all over the place while you work. 6- Fold the left leg of the rope over the center and behind the hanging piece of yarn, now fold the right side under the center piece of hanging yarn and over the right cord, now the rope comes up through the loop and passes over the left rope. Pull to tighten, but not too much, we want the knot to show. 7- Fold the left leg of rope again, under the center piece of hanging yarn over the right leg of the rope, the right leg of the rope goes over the center and then down through the loop formed by the fold and passes under the left rope. Tighten a bit but not too much so that the knot will show. 8- Thread blunt needle again with leftover hanging yarn and fasten off at back of frog. As you do that, take advantage of the yarn to secure the knots well so that they will not twist to the side. Secure well at back and cut yarn. 9- Thread blunt needle with the long tail left at the beginning of the rope. Now, working on the wrong side of the frog, begin to turn the end of the rope into a curl and to sew it in place by using the little loops that naturally form at the end of the rope as you crochet it. Keep turning and sewing with tiny stitches, until you reach the side of the center knots. Stitch to side of central knots using the little loops that form naturally on ropes. Secure at back. 10- Repeat the same process with the leftover leg of rope. Now you can sew you pretty for to your project! Done!
Muncher the Bear
-
These baby bears are super cute and relatively easy and quick to make and
have been loved and you can make one for charity or for a child you love.
Here...
7 years ago
Who Links To Me
FlowerumiPlace a Sweet Spor for Handmade Bear Lovers
I'm a certified crochet instructor, artist, animal lover, vegan foodie, and amateur gardener.
I've been crocheting since and I was a child, painting, and writing since I
was a teen, and puzzling since I discovered it. I love puzzles and recently I've found that there is not
much difference between weaving a beautiful design with yarn or with
words. Puzzle-making is like painting a picture, spinning a tale, or
crafting a piece of beautiful lace.




 Posts
Posts


