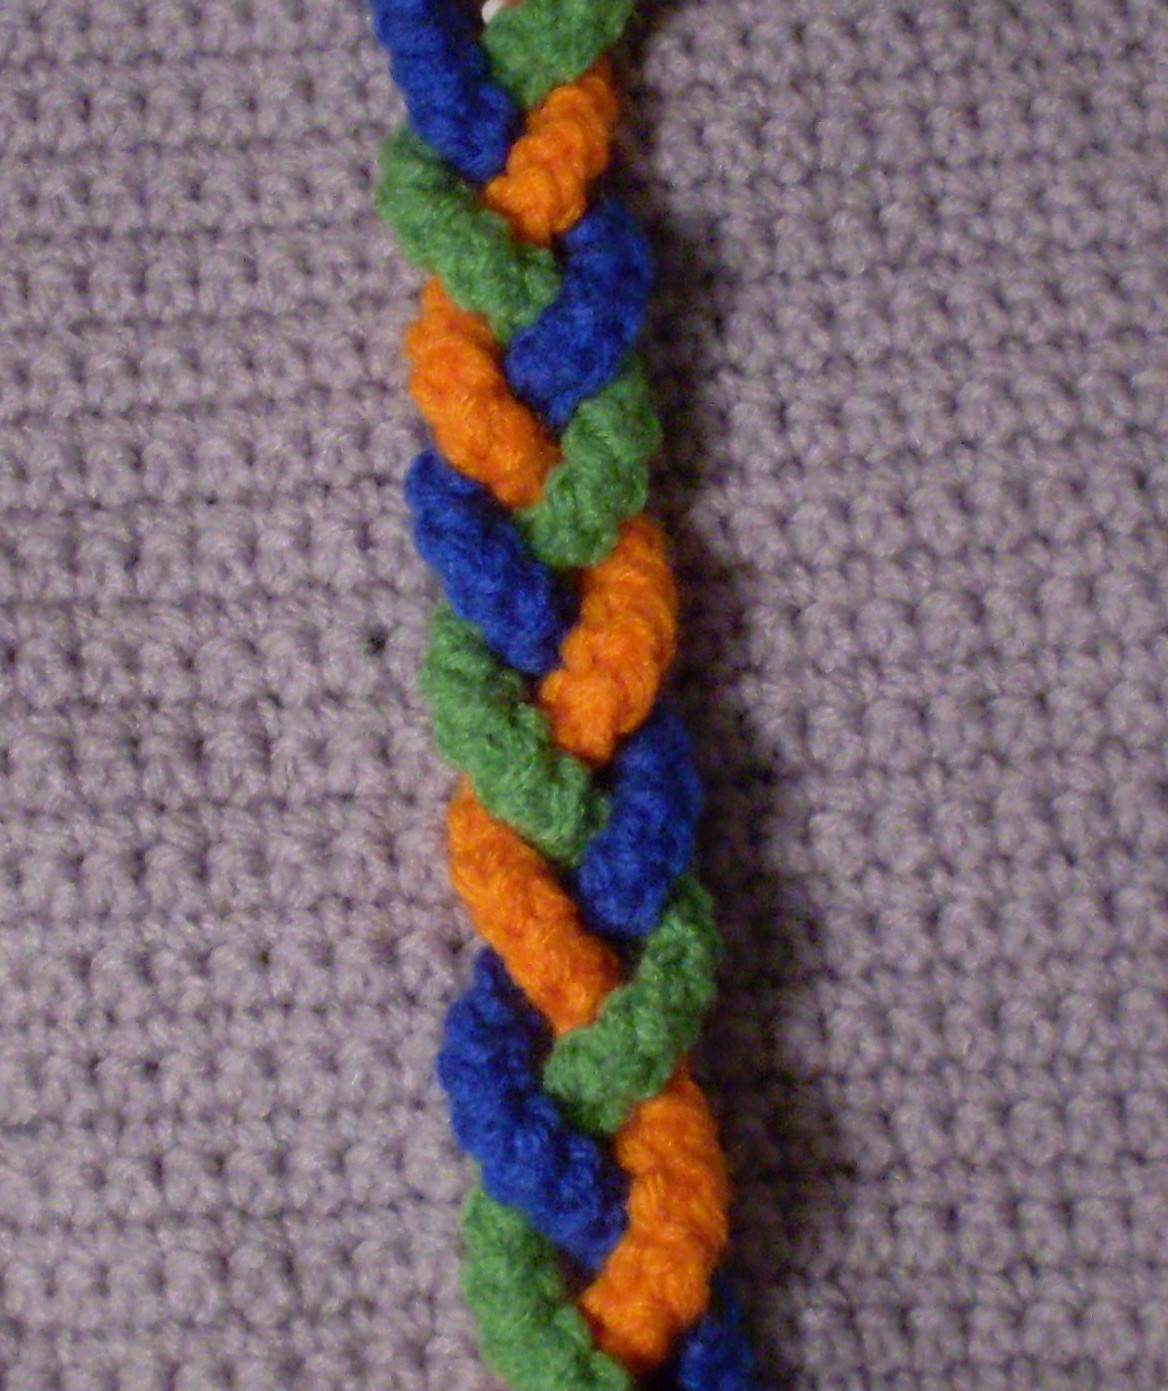
Amberly's Braid

Best Blog Tips

At first glance, this braid looks like a common 3-strand braid, but it is made with 4 ropes, so it can have 4 colors. You can make it monotone when you learn it well, but it will never have the impact that the multi-colored one has, because if makes you wonder, how come it has 4 colors if it is a 3-strand braid?
It is also pretty easy to make.

You will need 4 crocheted ropes for this pretty braid (please, refer to previous tutorials for information on how to make them) in the colors of your choice.
If you are a beginner, I suggest you make each rope a different color, because that way you will be able to follow the instructions better. Once you are used to making
these braids, you will be able to make them with ropes that have the same color without getting lost.

Pin the 4 ropes at the top of your bag, leaving a bit of excess that will go under the lining of the bag. (Refer to previous instructions.)

.................

Need encouragement? Visit this beautiful blog!

Better Than Rubies. . .
Best Blog Tips

Heidi's Braid

Best Blog Tips


This is another variation of the useful 4-strand braid.
It is strinking as a monotone braid but even more so if you make it in several colors as shown here.
Make your cords as explained before (please refer to previous tutorials)
Begin preparing your ropes as follows:

Pin your cords to the top of your bag or tote, leaving a little bit of excess to comfortably secure them on the
inside of the bag, and cover that with the lining. (If you are getting pretty good at this, you can also make the
braid and attach it to the bag before you put the bag togather, also allowing a bit of an excess at the bottom, which you will
sew alson on the inside and hide behind the lining.)

Now let's braid!

Consider your 4 strands of rope as two pairs. 1- Take the left rope of each pair and pass it over the rope on its right.
2- Now work with the two ropes in the middle. Pass the rope that is on the right and pass it over the rope on the left of it.
3- Now twist the two ropes that are on the left over each other 3 times, pin them in place. Do the same with the two on the right. Pin them in place.
4- Take out the pins, then take the left rope of each pair and cross it over the rope on its right. Working now with the ropes in the middle, pass the rope that is on the right and pass it over the rope on the left of it.
Repeat this process as many times as you need to get the length of braid you want to have.
________________________
In God's Workshop
Best Blog Tips

Kelly's Braid

Best Blog Tips


This is a pretty braid that looks as if it had been made with 3 strands of rope, but in reality it is made with 5. The difference between making this braid and making a common 3 rope braid is the change in colors, which is really evident and beautiful all through the length of the braid. You can use this braid to embellish a bag but also you can use it to make the bag's handle. if you want it to embellish the front of your bag, measure the length and make extra cord (please see our previous tutorials to see how we do it) pin the ropes to the top of your bag, leaving an excess that will go over the edge of the bag and we sewn to the inside of it and under the lining of the bag. If you want to use it for the handle of your bag, simply sew the ropes firmly to a ring and begin braiding, once you have the length of handle you want, sew the other end of the braid to another ring. Fasten off. Attach rings to bag.
This braid is worth making if you want wonderful colors! You don't get all these colors with 3-strand braids.

Here is how to make Kelly's braid:


After choosing what you will do with the braid, either sew the ropes to a ring or pin them to the top of your bag as explained before.


1. Take the first rope that lies to the right and bring it to the middle, then take the first rope that lies to the left and bring it to the middle and cross it on top of that one.


2. Take the rope that is now the first one on the right and bring it to the middle and then take the rope that has now become the first one on the left and cross it over that one.


Continue this process until you get the length of braid you want!


Encouraging Promises
Best Blog Tips

Anna-Marie's Braid

Best Blog Tips

My sister's name is Anna-Marie, so I decided to name this braid after her in honor of the fact that she's a terrific Sis. This is a very easy braid that you can use to decorate a tote or a large bag.
For the making of the cords, please refer to previous tutorials of this series.

Materials:
4 cords, twice the size of the bag or tote you will be decorating
Pins
Sewing thread in matching colors to attach cords to the bag
Sewing needle

Note- Until you learn how to make all these braids easily, use cords of different colors when you make them, so that it will be easier for you to follow the position of each cord and to get satisfactory results. (And to tell you the truth, braids look better when they're multicolored!)

To Make Anna-Marie's braid proceed as follows:

Make your cords, do not fasten off, just in case you need to either lengthen them or shorten them. Leave one end attached to yarn ball or skein and work with the opposite end.
1-To do the actual braiding, pin the 4 cords to the top of your bag, leaving a little excess that will go under the bag's lining and will be sewn to the inside of the bag under the lining.
2- Twist cords 1 and 2 together 3 times, pin down again. Twist cords 3 and 4 three times and pin pin place.
3- Pass cord 4 over cord 2, cord 2 over cord 4, and cord 4 under cord 1.
4- Place cord 3 over cord 1, then twist the two cords that wind up at both ends, the two on the left, twist them over each other, and the two that ended up on the right, over each other, pin in place. Rep steps 3 and 4 as many times as needed to complete your braid. Pin in place at each change.
Thread sewing needle with matching color and secure the braid to the bag.
Done!


Do you know someone who's unemployed? Share these encouraging promises with them!
Bible Promises for the Unemployed1
Best Blog Tips

Lilly's Braid

Best Blog Tips

This is a pretty easy and great looking rope braid that will greatly enhance any simple bag or tote or bag that you want to embellish. It is a 6-strand braid which, to start with, I recommend that you make with ropes of different colors so that you can easily follow what you do until you get it down pat and can make it with ropes of the same color against, say, a contrasting ground or a lighter or darker ground.

To start, make your ropes as explained in previous tutorials.
Make 6 ropes of co different colors twice as long as the size of your tote or bag. If possible, leave them unfinished at the bottom part of them, just in case you need to enlarge them or to shorten them when you are done braiding.
This is NOT an exact science! Pin your ropes at the top of the bag as usual, leaving a little excess which you will bed over the edge inwardly
and will be sewing to the inside of the bag, to be covered by the lining.
Think of your ropes as pairs. You have 3 pairs.
To make the braid proceed as follows:

1. Take the left rope of each pair and place it over the rope on its right side.

2. Skip the two outer ropes and working only with the ropes in the middle, take the right rope of each of the middle pairs and pass it over the left rope of each pair. (Look at the photos)


3. From here on you just repeat the first two steps over and over until you have the right length of rope for your project. Pin the edges down and sew all around with matching yarn.


You can make the braid tighter or you can open it up a bit more so that the background of the tote or bag can be seen behind it.


...........................................
Read FREE Online!
From Stress to Joy
Best Blog Tips

Pepper's Braid

Best Blog Tips


This is a pretty easy braid which will enhance any bag you want to embellish!
Note 1-
Unitl you learn how to make this braid well, i suggest that you learn to make it using 4 cords of different colors (it would look lovely against the black, dark brown, grey, white or beige crocheted fabric of a purse or bag.)
Or if you want to, use darker or lighter shades of the same color as the bag you will sew it to or contrasting variegated yarns that match or vice versa.
This will help you to keep track of where the cords are going until you learn this braid by heart, and no one will notice why you do it.
Materials:
4 Basic cords twice the size of the space they will be covering on the bag

Note 2- If you want to match the size of the cords exactly, do not fasten them off, but simply make bobbins before you start your cords with enough yarn to make more than twice the cord you believe you need, in case you need to add to your cord.
Nice little economic bobbins can be made from the little square closures of sandwich bread. Place the unfinished portion of the braid to the bottom of your work. If you can complete the braiding to your satisfaction with the amount of cord you already had, wonderful!
Simply fasten off, leaving a long tail to sew with, and sew the braid in place once you have finished it. But if you are short, simply attach pins to secure the braiding you have done above, and crochet yourself some more cord to finish your embellishment. Then, fasten off and sew in place.
Note 3- To keep your cords in place, pin them as you go so that they will not move from where you want them. If you want your braid to be as open as the one in the photos, keep the cords position "open" so that the crocheted fabric of your bag can be seen through the twists and turns of the braid.


Make Pepper's Braid as follows:


1- Place your 4 cords at the top of the bag you want to embellish, leaving 2 sc in between each cord. Pin them securely into place so that you can work freely.


2- Bring cord #1 over cord #2.


3- Bring cord #3 over cord #4.


4- Place cord 31 over cord #4 (which is now in the center)


5- Bring cord #3 over cord #1


6- Place cord #2 over cord #4


To continue, repeat from step 2 to step 6 as many times as necessary, pinning in place so that the cords will stay in desired shape for a beautiful open braid.


...........................................
Read FREE Online!
From Stress to Joy
Best Blog Tips

Embellish it With Ropes--Faux Cabling 3

Best Blog Tips
We will now make two braids, each with three ropes. These are the simplest kind to make, especially when you want to add "something" to a project in the spur of the moment or are in some hurry to finish it. (By the way, the names for these braids are my own, and the way I make them is also my own, they don't come from any book or publication like this.)

Undecided Braid- Materials: Ropes of colors of your choice crocheted in advance. Pins Blunt needle to sew finished braid in place Yarn or embroidery yarn to sew through side loops of braid Measuring tape This is a 3 strand braid that goes from side to side, chaging from a right side braid to a left side braid on purpose, to make it a bit fancier.


To work this braid proceed as follows: Arrange three ropes at the top of your project, pinning them to the top, but leaving a portion of the braid unworked so that you can later on sew it underneath the lining of the bag. Center them well, use a measuring tape, if necessary to make sure they are centered. To braid do this: 1- Take the rope on the right and bring over the middle rope. 2- Take the rope on the leftt and place it over the new middle rope. 3- Take the new left rope and place it over the middle rope. 4- Take the rope on the right and place it over the middle rope. 5-Take the new rope on the left and place it over the new middle rope. Tighten the rope a bit. Tighten a bit. Repeat these 5 steps once more. Now comes the change: 6- Take the new middle rope and place it UNDER the rope on the left. 7- Take the rope on the right and place it OVER the new middle rope. 8- Take the new rope on the right and place it over the middle rope. 9- Take the rope on the left and place it over the middle rope AND the rope on the right. 10- Take the new rope on the left and pass it over the middle rope. 11- Take the rope on the right and plass it over the middle rope. Continue this way indefinitely. You can also make a longer braid that will encircle the middle of the bag and disappear behind the sewn sides, but for that, you must make your braid before you completely sew the bag.


Wanna Walk Down the Middle Braid- Materials: Ropes of colors of your choice crocheted in advance. Pins Blunt needle to sew finished braid in place Yarn or embroidery yarn to sew through side loops of braid Measuring tape This is a 3 strand braid that goes from side to side, chaging from a right side braid to a left side braid on purpose, to make it a bit fancier.


To work this braid proceed as follows: 1- Take the rope in the middle and place it over the rope on the left. 2- Take the new rope in the middle and place it over the new rope on the right. 3- Take the rope in the middle and place it over the rope on the left. 4- Take the new rope on the middle and place it over the rope on the right. Continue this way indefinitely until you get the length of braid you need for your bag or purse.


FREE online, the beautiful book on the life of Christ, The Desire of Ages see the comforting love of God like never before in these tough times!

Best Blog Tips